Few things match the sheer satisfaction of biting into a perfectly crafted sandwich where textures and flavors collide in harmony. If you love a great crunch but want to skip the heavy mess of deep frying, you are in the perfect place. Today, we are diving deep into a lighter twist on a Japanese comfort food staple that will absolutely transform your lunch routine: Crunchy Baked Chicken Katsu Sandwiches. By using a clever kitchen technique to toast your breadcrumbs before they ever hit the oven, you get that deep, golden, shattering crispiness usually reserved for the deep fryer. This comprehensive guide will walk you through the history, the science of the crunch, and every single step needed to build the ultimate restaurant-quality sandwich right in your own kitchen.
What is a Chicken Katsu Sandwich?
To truly appreciate this dish, it helps to understand what makes it so legendary in the culinary world. A traditional chicken katsu sandwich, often referred to as a katsu sando in its homeland, is a beautiful study in contrast. At its core, it features a juicy, tender chicken cutlet that has been coated in flaky breadcrumbs and fried to perfection. This crispy powerhouse is then nestled between slices of incredibly soft, pillowy white bread.
To keep things from feeling too heavy, the sandwich is packed with finely shredded cabbage and dressed with savory, tangy sauces. In our version, we are trading the traditional deep frying method for an ingenious baking technique. We still achieve that signature, loud crunch while keeping the entire meal feeling much lighter and entirely fuss-free to clean up.
Origin of That Famous Recipe
The story of the katsu sandwich is a fascinating journey of culinary adaptation and cultural fusion. The word katsu is short for katsuretsu, which is the Japanese translation of the English word cutlet. This style of cooking belongs to a category of Japanese cuisine known as yoshoku, which refers to Western-influenced dishes that were adapted to local tastes during the late nineteenth and early twentieth centuries.
Originally, the concept was inspired by European dishes like the Austrian schnitzel or the Italian cotoletta. However, Japanese chefs put their own spin on it by using thick, airy breadcrumbs known as panko and serving it alongside a deeply savory, fruit-based brown sauce.
The brilliant idea to stick this crispy cutlet between two slices of soft bread originally catered to busy workers, commuters, and theatergoers in Tokyo who needed a satisfying, portable meal they could eat easily with their hands. Over the decades, the katsu sando evolved from a convenient street snack into a global phenomenon celebrated by food lovers everywhere.
The Secret to Oven-Baked Crunch
The biggest challenge when shifting from frying to baking is replicating that gorgeous, uniform golden color and the shattering texture. If you put raw breadcrumbs into the oven on top of chicken, the meat often cooks through before the crumbs have a chance to turn truly golden brown, leaving you with a pale, slightly soggy exterior.
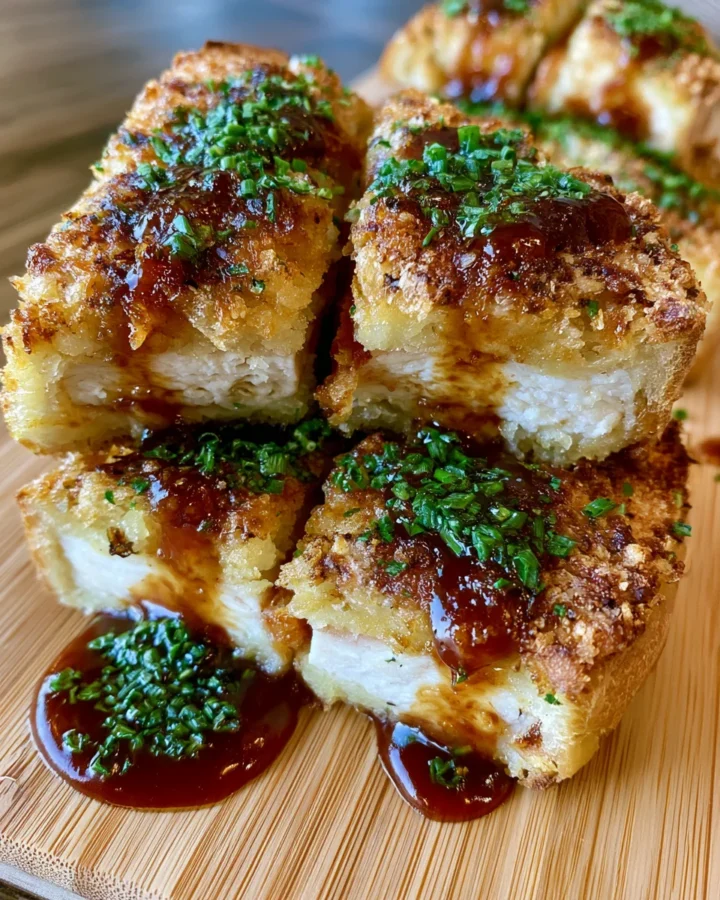
We solve this problem entirely by toasting our panko breadcrumbs in a small amount of oil in a skillet before we ever apply them to the chicken. This ensures every single crumb is already beautifully golden, crisp, and infused with a touch of richness. When it bakes, the oven simply locks that crunch into place while keeping the chicken inside incredibly moist and juicy.
Ingredients with Quantity
To make four generous sandwiches, gather the following high-quality components. We have broken them down by each element of the sandwich so you can easily organize your workspace before you begin cooking.
For the Chicken
-
Two large boneless skinless chicken breasts: approximately four hundred and fifty grams or one pound in total weight.
-
One cup panko breadcrumbs: these are large, flaky Japanese breadcrumbs that provide a superior crunch compared to standard fine breadcrumbs.
-
Two tablespoons vegetable or canola oil: divided evenly to use for toasting the crumbs and binding the egg wash.
-
Half cup all purpose flour: used as the initial dusting coat to help the egg adhere to the meat.
-
One large egg: thoroughly beaten to act as the glue for our crispy coating.
-
One teaspoon salt: for essential seasoning.
-
One teaspoon black pepper: for a clean, sharp bite.
For the Cabbage Slaw
-
Two cups finely shredded green cabbage: sliced as thin as humanly possible to provide a refreshing, crisp texture.
-
One tablespoon rice vinegar: brings a mild, slightly sweet acidity to balance the richness.
-
One teaspoon soy sauce: adds a deep, savory depth of flavor.
-
One teaspoon honey: provides a touch of natural sweetness to balance the vinegar.
-
One teaspoon sesame oil: offers an unmistakable nutty aroma and rich finish.
Spicy Mayo
-
Half cup mayonnaise: use Japanese Kewpie mayonnaise if you can find it, as it uses only egg yolks for a richer texture and flavor profile.
-
One to two tablespoons sriracha: adjust this based on how much heat you prefer.
-
One small garlic clove: completely grated to add a punchy, savory backbone to the sauce.
For Assembly
-
Eight slices soft white bread: traditional Japanese milk bread, known as shokupan, is highly recommended for its sweet flavor and cloud-like texture.
-
Tonkatsu sauce: a thick, sweet, and savory Japanese barbecue sauce, used to drizzle over the cutlets to your liking.
Step by Step Direction and Preparation Method: Baked Chicken Katsu Sandwiches

Follow these sequential steps closely to ensure your chicken cooks perfectly and your sandwiches are assembled for maximum structural integrity and crunch.
1. Prepare the Crispy Coating
Begin by preheating your oven to four hundred degrees Fahrenheit, which is equivalent to two hundred degrees Celsius. Take a skillet and place it over medium low heat, adding one tablespoon of your vegetable or canola oil. Pour in the one cup of flaky panko breadcrumbs.
Stir the breadcrumbs constantly for two to three minutes. Watch them carefully, as they can go from pale to burnt very quickly. As soon as they turn a beautiful, light golden brown color, transfer them immediately to a wide, shallow bowl and let them cool down completely. This simple step is your ultimate guarantee for an authentic crunch.
2. Prepare and Bread the Chicken
Take your two large chicken breasts and slice them horizontally through the middle to create four even cutlets. Place the cutlets between sheets of plastic wrap or wax paper and use a meat mallet or the bottom of a heavy skillet to gently pound them until they are uniform throughout, aiming for roughly a quarter inch or six millimeters in thickness. Season both sides of all four cutlets evenly with your salt and pepper.
Next, set up a classic three-bowl breading station in a neat row. In the first bowl, add your all purpose flour. In the second bowl, thoroughly whisk your beaten egg along with the remaining one tablespoon of oil. Lastly, in the third bowl, lay out your cooled, toasted panko breadcrumbs.
Working with one cutlet at a time, press the chicken into the flour until completely coated, then gently tap off any excess. Dip the floured chicken into the egg mixture, ensuring no dry spots remain. Finally, press the chicken firmly into the toasted panko, making sure the crumbs cover every square millimeter of the surface.
3. The Baking Process
Line a large baking sheet with aluminum foil for easy cleanup, then place a wire baking rack directly on top of the sheet. Arrange your four fully breaded chicken cutlets on the wire rack, leaving a bit of space between each piece so the hot air can circulate underneath.
Slide the baking sheet into your preheated oven and bake for twenty to twenty-five minutes. You are looking for the chicken to cook thoroughly until it registers an internal temperature of one hundred and sixty-five degrees Fahrenheit, which is seventy-four degrees Celsius. Once cooked, remove the sheet from the oven and let the chicken rest on the rack for three to five minutes to allow the juices to redistribute.
4. Whip Up the Sides and Sauces
While your chicken is baking in the oven, you can easily prepare your fresh components. For the cabbage slaw, place your two cups of finely shredded green cabbage into a medium bowl. In a separate small cup, whisk together the rice vinegar, soy sauce, honey, and sesame oil. Pour this dressing directly over the cabbage and toss everything together thoroughly so the leaves soften slightly.
For the spicy mayo, grab another small bowl and combine your half cup of mayonnaise, your sriracha, and the finely grated garlic clove. Stir the mixture until it is completely smooth and uniform in color, then give it a quick taste to see if you want to add a splash more sriracha for extra heat.
5. Final Assembly of the Sandwiches
Lay out your eight slices of soft white bread on a clean work surface. Spread a generous layer of your freshly made spicy garlic mayo evenly across one side of each slice of bread. Place one warm, crispy baked chicken cutlet directly onto four of the bread slices.
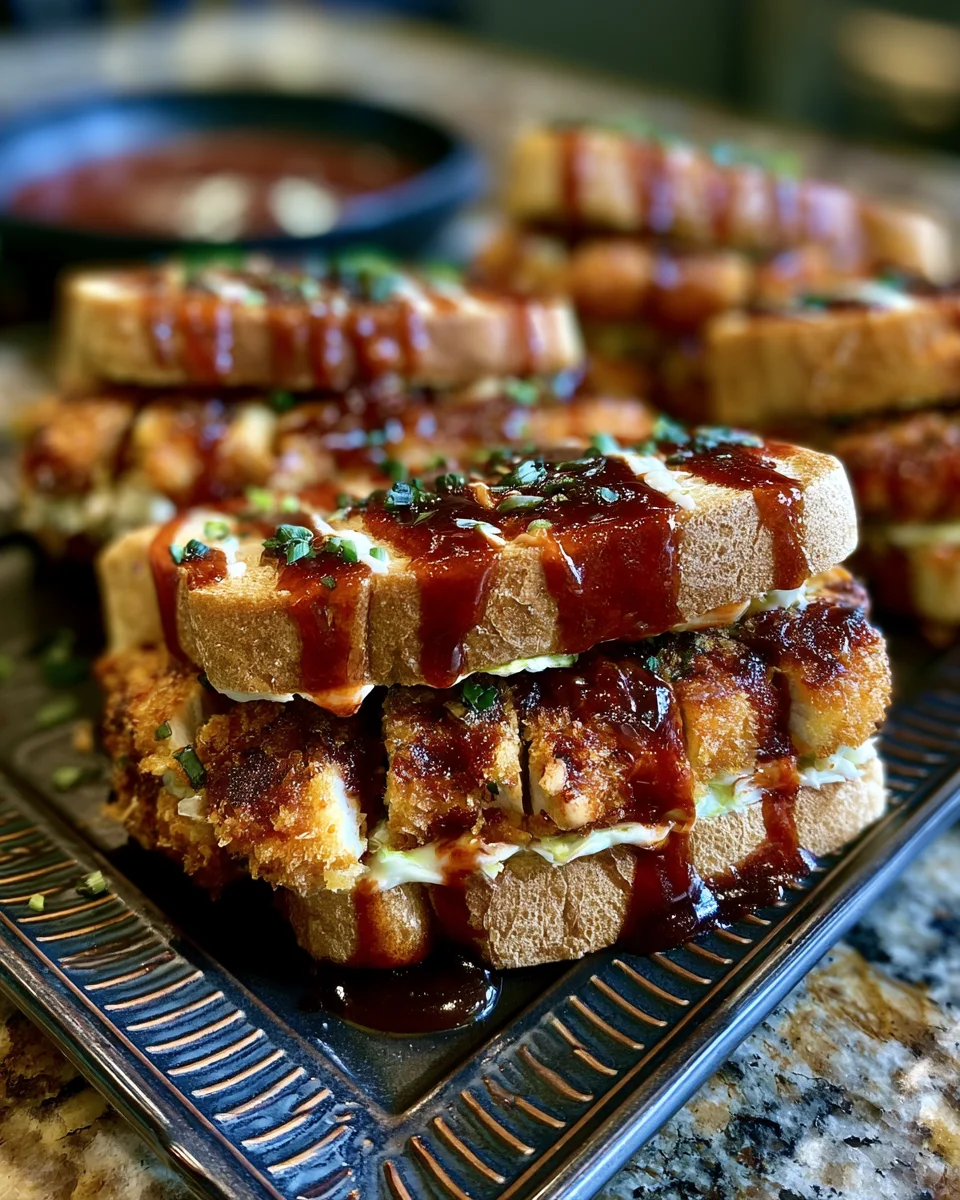
If you are using tonkatsu sauce, drizzle it generously over the top of the chicken cutlets. Next, pile a massive, hand-sized mound of the seasoned cabbage slaw directly over the chicken. Top each sandwich with the remaining slices of bread, mayo side facing down.
To achieve that iconic, authentic look often found in Japanese cafes, use a sharp serrated knife to carefully trim away the crusts from all four sides of the sandwiches. Cut each sandwich cleanly down the middle into two perfect halves and serve immediately while the chicken is warm and the bread is perfectly soft.
Variations to Try: Baked Chicken Katsu Sandwiches
Once you have mastered the classic preparation, you can easily adapt this versatile recipe to suit your personal preferences or dietary needs.
-
The Pork Classic: If you want to explore the ultimate traditional route, swap out the chicken breasts for boneless pork loin chops. Pound them down to the exact same thickness and follow the exact same breading and baking steps for a wonderful baked pork katsu.
-
A Touch of Cheese: For a popular contemporary twist, slice a pocket into your chicken cutlets before breading them and stuff them with a slice of low moisture mozzarella cheese. As it bakes, the cheese will melt entirely, giving you a glorious, gooey surprise when you cut the sandwich in half.
-
Bringing the Heat: If you are a true fan of spicy food, add a half teaspoon of cayenne pepper directly into your flour mixture and add an extra splash of sriracha or hot sauce straight into the egg wash to infuse heat into every single layer.
FAQs: Baked Chicken Katsu Sandwiches
Can I make Baked Chicken Katsu Sandwiches ahead of time for lunch?
It is best to keep the components stored separately if you are planning to eat them later. You can easily bake the chicken ahead of time and keep it in an airtight container in your refrigerator. When you are ready to eat, simply reheat the chicken cutlet in a toaster oven or standard oven until it warms through and crisp up again, then assemble the sandwich fresh with your slaw and sauces so the bread never gets soggy.
What can I use if I cannot find Japanese milk bread?
If Japanese milk bread is unavailable at your local bakery or grocery store, do not worry. You can look for a thick-cut, high-quality white bread, a brioche loaf, or even soft potato bread. The main goal is to use a bread that is soft, slightly sweet, and thick enough to contrast nicely with the loud crunch of the chicken.
Is there a good substitute for tonkatsu sauce?
If you cannot find bottled tonkatsu sauce at your store, you can quickly whip up a simple substitute at home. Just mix together equal parts of standard ketchup and Worcestershire sauce, then add a tiny splash of soy sauce and a pinch of sugar to taste. It provides a very similar sweet, savory, and tangy profile that complements the crunchy chicken beautifully.
Conclusion: Baked Chicken Katsu Sandwiches
Creating a restaurant-quality meal at home does not have to mean dealing with splattering oil or heavy cleanup. These Crunchy Baked Chicken Katsu Sandwiches deliver absolutely everything you want from a classic comfort food: an unbelievable crunch, juicy chicken, a bright and tangy cabbage slaw, and a creamy, spicy kick from the garlic mayo. By taking the extra couple of minutes to toast your panko breadcrumbs beforehand, you unlock a spectacular texture that proves baking can easily rival the deep fryer. Gather your fresh ingredients, set up your breading station, and treat yourself to a fresh, vibrant, and incredibly satisfying sandwich experience right in your own kitchen tonight.
Print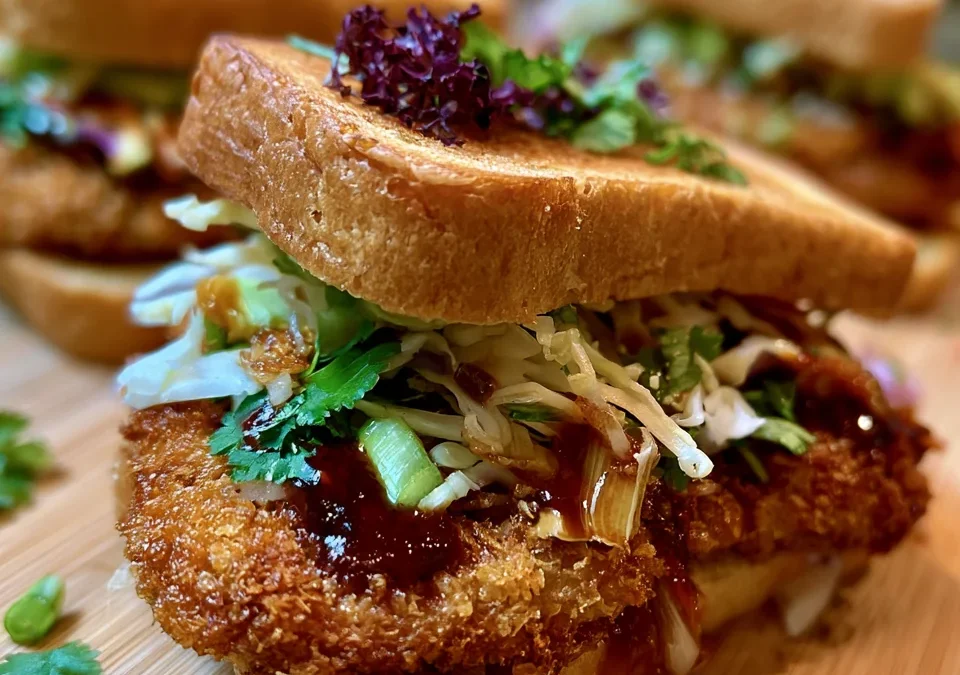
Crunchy Baked Chicken Katsu Sandwiches
- Total Time: 40 minutes
- Yield: 4 sandwiches 1x
Description
To truly appreciate this dish, it helps to understand what makes it so legendary in the culinary world. A traditional chicken katsu sandwich, often referred to as a katsu sando in its homeland, is a beautiful study in contrast. At its core, it features a juicy, tender chicken cutlet that has been coated in flaky breadcrumbs and fried to perfection. This crispy powerhouse is then nestled between slices of incredibly soft, pillowy white bread.
Ingredients
For the chicken
- 2 large boneless, skinless chicken breasts (about 450 g / 1 lb)
- 1 cup panko breadcrumbs
- 2 tbsp vegetable or canola oil, divided
- ½ cup all-purpose flour
- 1 large egg, beaten
- 1 tsp salt
- 1 tsp black pepper
For the cabbage slaw
- 2 cups finely shredded green cabbage
- 1 tbsp rice vinegar
- 1 tsp soy sauce
- 1 tsp honey
- 1 tsp sesame oil
For the spicy mayo
- ½ cup mayonnaise (Kewpie if available)
- 1–2 tbsp sriracha
- 1 small garlic clove, grated (optional)
For assembly
- 8 slices soft white bread or Japanese milk bread
- Tonkatsu sauce (optional)
Instructions
1. Prepare the crispy coating
- Preheat oven to 400°F (200°C).
- Heat 1 tbsp oil in a skillet over medium-low heat.
- Add panko and stir constantly for 2–3 minutes until lightly golden.
- Transfer to a shallow bowl and let cool. Toasting the panko beforehand is a key trick for extra crunch when baking.
2. Bread the chicken
- Slice chicken breasts horizontally into 4 cutlets.
- Pound to about ¼-inch (6 mm) thickness.
- Season with salt and pepper.
- Set up three bowls:
- Flour
- Beaten egg mixed with remaining 1 tbsp oil
- Toasted panko
- Coat each cutlet in flour, then egg, then panko.
3. Bake
- Place chicken on a wire rack set over a baking sheet.
- Bake for 20–25 minutes, until the chicken reaches 165°F (74°C) internally.
4. Make the slaw
Mix cabbage, rice vinegar, soy sauce, honey, and sesame oil in a bowl. Toss well.
5. Make the spicy mayo
Stir together mayonnaise, sriracha, and grated garlic.
6. Assemble the sandwiches
- Spread spicy mayo on one slice of bread.
- Add a chicken cutlet.
- Drizzle with tonkatsu sauce if desired.
- Top with a generous handful of cabbage slaw.
- Add the second slice of bread.
- Trim crusts for an authentic katsu-sando style and cut in half. Traditional katsu sandwiches are often served on soft white or milk bread with shredded cabbage.
Notes
This Crunchy Baked Chicken Katsu Sandwich delivers all the crispy, satisfying texture of traditional chicken katsu with less oil and effort. Perfect for lunch, dinner, or meal prep, it’s a crowd-pleasing sandwich that’s both comforting and flavorful.
- Prep Time: 15 minutes
- Cook Time: 25 minutes
- Category: Main Course
- Method: Baked
- Cuisine: Japanese-Inspired
Nutrition
- Serving Size: 1 sandwich
- Calories: 580 kcal
Keywords: Crispy Baked Katsu Sando, Healthy Chicken Katsu Sandwich, Oven Baked Chicken Katsu