There is something completely magical about a dessert that bridges the gap between a classic bakery treat and a warm, comforting restaurant finale. If you are looking to elevate your dessert game, learning how to bake a perfect gooey deep-dish skillet cookie is the ultimate way to satisfy your sweet tooth. This is not just any ordinary sweet treat; it is an experience. Imagine digging your spoon into a thick, golden-edged masterpiece with a center so wonderfully soft it practically melts on your tongue.
By combining simple pantry staples with the incredible heat-retaining properties of cast-iron cookware, you can create a showstopping dessert that turns every dinner into a special occasion. This comprehensive guide walks you through every detail, tip, and secret trick needed to master this legendary comfort food in your own home kitchen.
What is a Gooey Deep-Dish Skillet Cookie?
To truly appreciate this dessert, it helps to understand exactly what sets a gooey deep-dish skillet cookie apart from standard baked goods. Often referred to in casual dining circles as a “pizookie” (a portmanteau of pizza and cookie), this dish takes traditional chocolate chip dough and packs it into a heavy skillet rather than portioning it onto flat baking sheets.
Understanding the Texture Dynamic
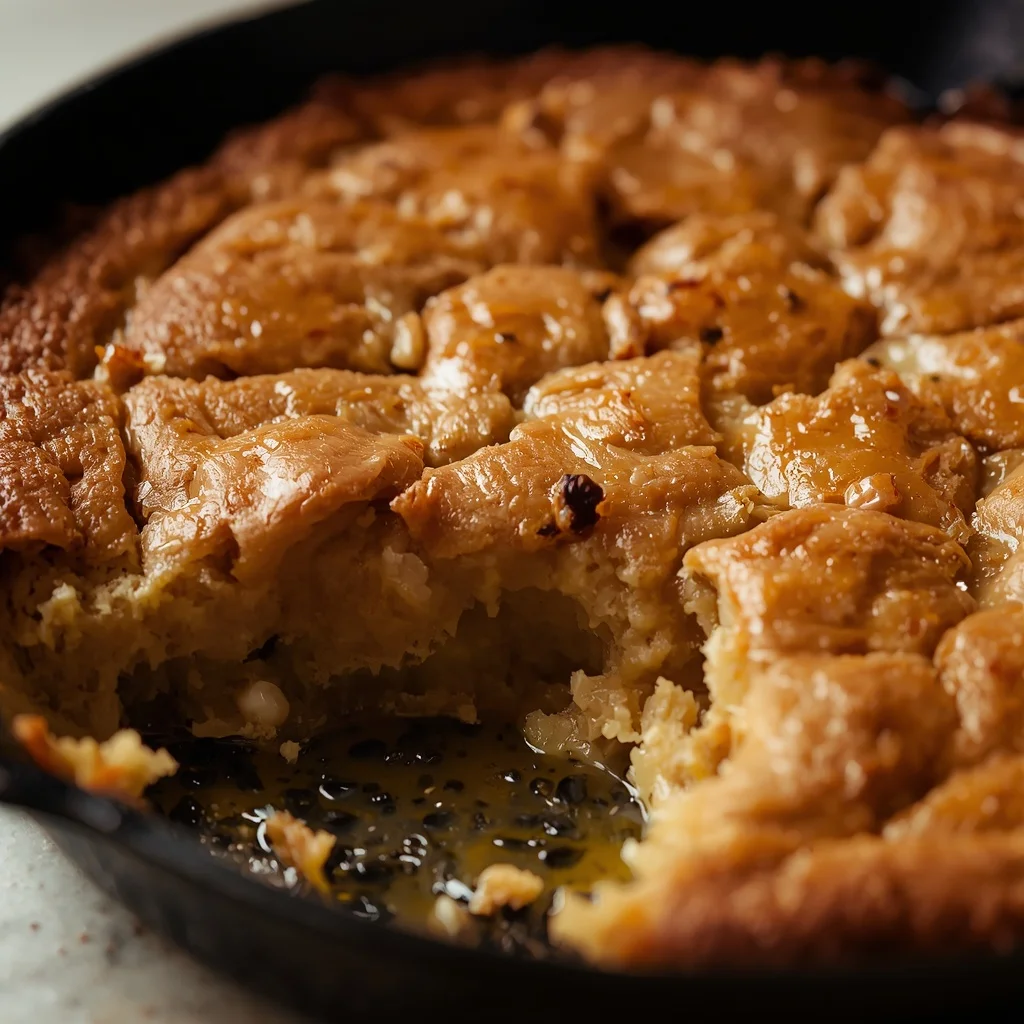
The primary appeal lies entirely in the unique texture gradient created during baking. When you bake individual cookies on a sheet, dry hot air surrounds each small ball of dough. This causes the moisture to evaporate rapidly, leading to a uniform crispness or a standard chewy bite throughout.
When the same dough is pressed into a deep pan, the physics of baking shift dramatically. The heavy metal walls protect the sides of the dough, allowing them to brown slowly and develop a caramelized, crunchy exterior crust. Meanwhile, the sheer volume of dough in the center remains shielded from the direct heat. The result is a magnificent contrast: a deeply golden, structurally sound outer ring that gives way to an ultra-soft, molten, and gooey interior core.
The Fascinating Origin of gooey deep-dish skillet cookie
While home bakers have been pressing dough into various baking pans for generations, the commercial rise of the gooey deep-dish skillet cookie can be traced directly to popular American restaurant chains in the late twentieth century. Specifically, a well-known brewery and restaurant franchise popularized the concept by baking individual-sized desserts in miniature pizza pans and serving them straight to tables under giant scoops of ice cream.
The Evolution of Comfort Food
The concept evolved out of a desire to serve fresh, hot desserts without forcing restaurant kitchens to manage the precise timing of rolling out delicate individual cookies to order. Baking the dough in a single, durable vessel proved to be highly efficient for chefs while offering an unforgettable presentation for diners.
Over the years, passionate home cooks realized that using heavy cast iron at home yielded an even better result than the thin aluminum pans used in commercial restaurants. The iron distributes heat with incredible uniformity, turning a simple convenience food into an artisanal dessert method loved by families worldwide.
Essential Ingredients for Success: gooey deep-dish skillet cookie
The beauty of a great gooey deep-dish skillet cookie lies in its simplicity. You do not need complex kitchen gadgets or rare extracts to achieve restaurant-quality results. However, because the ingredient list is straightforward, the quality and preparation of each component play a vital role in the final texture and flavor profile.
The Sweet and Fat Foundations
-
Unsalted Butter: You will need one-half cup of unsalted butter. For this specific method, the butter must be completely melted and then allowed to cool slightly. Melting the butter breaks down its emulsion, which leads to a denser, much chewier texture rather than a light, cake-like crumb.
-
Brown Sugar: Pack one-half cup of brown sugar into your measuring cup. Brown sugar contains molasses, which adds a deep caramel note and introduces essential moisture to keep the center incredibly soft.
-
Granulated White Sugar: Use one-quarter cup of standard white granulated sugar. This component works alongside the brown sugar to help crisp up those beautiful outer edges.
The Structure and Flavor Builders
-
Large Egg: One large egg at room temperature acts as the primary binding agent, providing structure and richness to the dough.
-
Vanilla Extract: One teaspoon of pure vanilla extract cuts through the sweetness and enhances the aromatic profile of the melted chocolate.
-
All-Purpose Flour: Spoon and level one and one-quarter cups of standard all-purpose flour. Avoid over-measuring, as excess flour will dry out the dough and ruin the molten centerpiece.
-
Baking Soda: One-half teaspoon of baking soda helps the dough rise just enough to keep it from becoming unpleasantly heavy.
-
Fine Salt: One-half teaspoon of fine salt is necessary to balance the sugars and make the chocolate flavor pop.
The Mix-Ins and Finishes
-
Chocolate Chips or Chunks: Measure out one full cup of high-quality chocolate chips or rough chunks. A mix of semi-sweet and dark chocolate provides the most sophisticated flavor balance.
-
Chopped Nuts (Optional): If you enjoy a bit of textural contrast, one-half cup of chopped walnuts or pecans adds a wonderful earthy crunch.
-
Flaky Sea Salt: A generous pinch of coarse, flaky sea salt sprinkled over the top right before baking completely transforms the dessert by cutting through the rich sugars.
Step-by-Step Direction and Preparation Method: gooey deep-dish skillet cookie
Mastering the execution of a gooey deep-dish skillet cookie requires focusing closely on how the dough is handled and monitored in the oven. Follow these clear, chronological steps carefully to guarantee an ideal bake.
+-----------------------------------------------------------------+
|                       BAKING TIMELINE                           |
|                                                                 |
|  [Prep: 15 Min]  -->  [Bake: 25-30 Min]  -->  [Cool: 10-15 Min] |
|  Mix ingredients      Watch for golden        Residual heat      |
|  & press dough        edges, soft center      sets the core      |
+-----------------------------------------------------------------+
Phase One: Oven and Skillet Prep
Before you touch any ingredients, preheat your home oven to three hundred and fifty degrees Fahrenheit. While the oven heats up, take a small pat of butter or a light coating of cooking spray and thoroughly grease your eight-inch or ten-inch oven-safe skillet. Pay special attention to the corners where the bottom meets the sidewalls, as this prevents the sticky sugars from locking onto the pan.
Phase Two: Wet Ingredient Emulsion
In a large mixing bowl, pour in your melted and slightly cooled unsalted butter. Add the one-half cup of brown sugar and one-quarter cup of granulated white sugar. Whisk the mixture vigorously by hand until the grains combine and the mixture looks completely smooth. Once the sugar and fat are unified, crack in the room-temperature egg and pour in the vanilla extract. Beat the mixture again until it turns slightly pale and thickens.
Phase Three: Incorporating Dry Ingredients
Add the all-purpose flour, baking soda, and fine salt directly into your wet mixture. Switch from a whisk to a sturdy wooden spoon or a silicone spatula. Stir the dough gently, stopping the absolute moment you can no longer see streaks of dry white flour. Over-mixing at this stage develops excess gluten, which can turn your melt-in-your-mouth treat into something tough and bready.
Phase Four: The Chocolate Fold and Press
Gently fold your chocolate chips or chunks into the thick dough alongside the optional chopped walnuts or pecans if you choose to use them. Once distributed, scrape the thick dough into your prepared skillet. Use the back of your spoon or clean, damp fingers to press the dough into a perfectly even layer across the bottom of the pan. Finish by scattering a beautiful pinch of flaky sea salt evenly across the surface.
Phase Five: Precision Baking
Place the skillet onto the center rack of your preheated oven. Bake the dessert for twenty-five to thirty minutes. You must watch the clock and the pan closely during the final minutes. The goal is to remove the skillet when the outer edges are deeply golden brown and starting to pull away slightly from the sides, but the center couple of inches still look soft, pale, and visibly underbaked.
Remove the skillet from the heat using heavy oven mitts and place it onto a heat-safe trivet. Allow the dessert to rest undisturbed for ten to fifteen minutes. The intense residual heat stored within the thick iron walls will finish cooking the raw center just enough to make it safe to eat while keeping it beautifully velvety.
Delicious Recipe Variations to Try: gooey deep-dish skillet cookie
Once you have mastered the classic chocolate chip version, you can easily alter the base formula to create wildly different flavor profiles based on your personal cravings or seasonal themes.
The Triple Chocolate Decadence
For a truly intense cocoa experience, replace one-quarter cup of the all-purpose flour with high-quality unsweetened cocoa powder. Then, use a blend of white chocolate chips, milk chocolate chunks, and dark chocolate discs for your mix-ins. This creates a multi-layered flavor profile that tastes like an ultra-fudge brownie mixed with a traditional cookie.
White Chocolate Macadamia Classic
If you prefer a buttery, vanilla-forward profile, swap out the traditional semi-sweet chocolate entirely. Instead, fold in three-quarters cup of white chocolate chunks and one-half cup of toasted, roughly chopped macadamia nuts. The tropical crunch of the nuts cuts through the rich sweetness of the white chocolate beautifully.
S’mores Campfire Special
Transform your skillet into a summer campfire experience by pressing half of the standard dough into the bottom of the pan. Lay down a solid layer of graham cracker squares and a handful of mini marshmallows. Top with the remaining cookie dough, pressing it down gently, and scatter extra chocolate chunks on top before baking.
Pro Tips for Achieving Ultimate Gooeyness: gooey deep-dish skillet cookie
Achieving the perfect texture requires understanding a few subtle nuances of baking science. If your skillet bakes up too dry or too cakey, implementing these tiny adjustments will completely change your results.
Swap Chips for Chunks
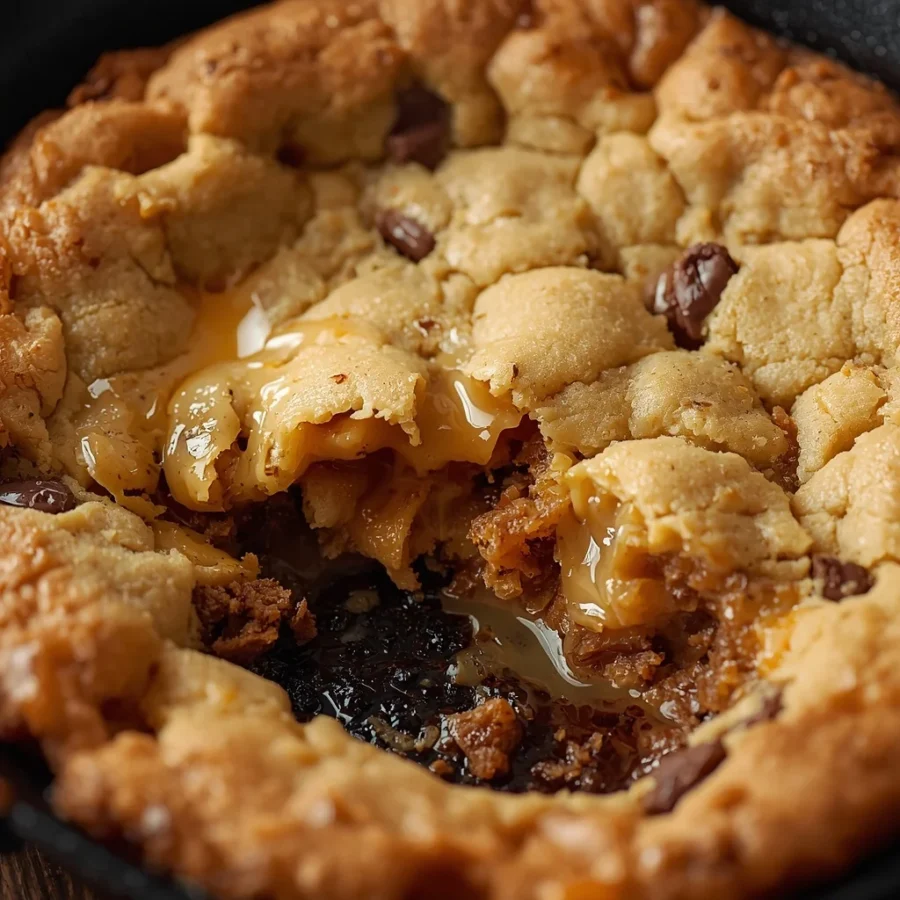
Standard chocolate chips are specifically manufactured with stabilizers designed to help them retain their distinct teardrop shape under intense heat. While they taste fantastic, they do not create those large, flowing rivers of chocolate. Hand-chopping a high-quality chocolate bar into irregular chunks ensures that different sizes melt at different rates, resulting in massive, molten pockets of chocolate throughout the entire dessert.
Mind the Skillet Size
The size of your cast-iron pan will alter your baking times significantly. An eight-inch skillet creates a very thick layer of dough, requiring closer to thirty minutes in the oven and yielding a remarkably molten core. A ten-inch skillet spreads the dough out thinner, meaning it will bake much faster. If using a larger ten-inch pan, check the center at twenty-two minutes to avoid over-baking the middle.
Frequently Asked Questions: gooey deep-dish skillet cookie
Can I make gooey deep-dish skillet cookie ahead of time?
Yes, you can absolutely prepare the dough in advance. Press the raw dough directly into the skillet, wrap the entire pan tightly in plastic wrap, and store it in your refrigerator for up to forty-eight hours. When you are ready to serve, bake it straight from the fridge, adding roughly three to five extra minutes to the total baking time to account for the cold pan.
What if I do not own a cast-iron skillet?
While cast iron provides the most authentic texture due to its superior heat retention, you can use any heavy, oven-safe frying pan, a cake pan, or a ceramic pie dish. Keep a close eye on the oven, as thinner metals conduct heat faster and may require you to pull the dessert out a few minutes early.
How do I store and reheat leftovers?
If you happen to have any leftovers, cover the skillet tightly with foil or transfer slices to an airtight container. Keep it at room temperature for up to three days. To revive that signature freshly baked texture, place a slice on a plate and microwave it for fifteen to twenty seconds, or pop the entire skillet back into a warm oven for five minutes.
Conclusion: gooey deep-dish skillet cookie
Baking a spectacular dessert at home does not require professional training or complicated instructions. This magnificent gooey deep-dish skillet cookie proves that combining basic ingredients with the right technique can create an unforgettable culinary masterpiece. By focusing on the balance of sugars, melting your butter to ensure a dense chewiness, and purposefully under-baking the center, you unlock a depth of texture that traditional baking sheets simply cannot replicate.
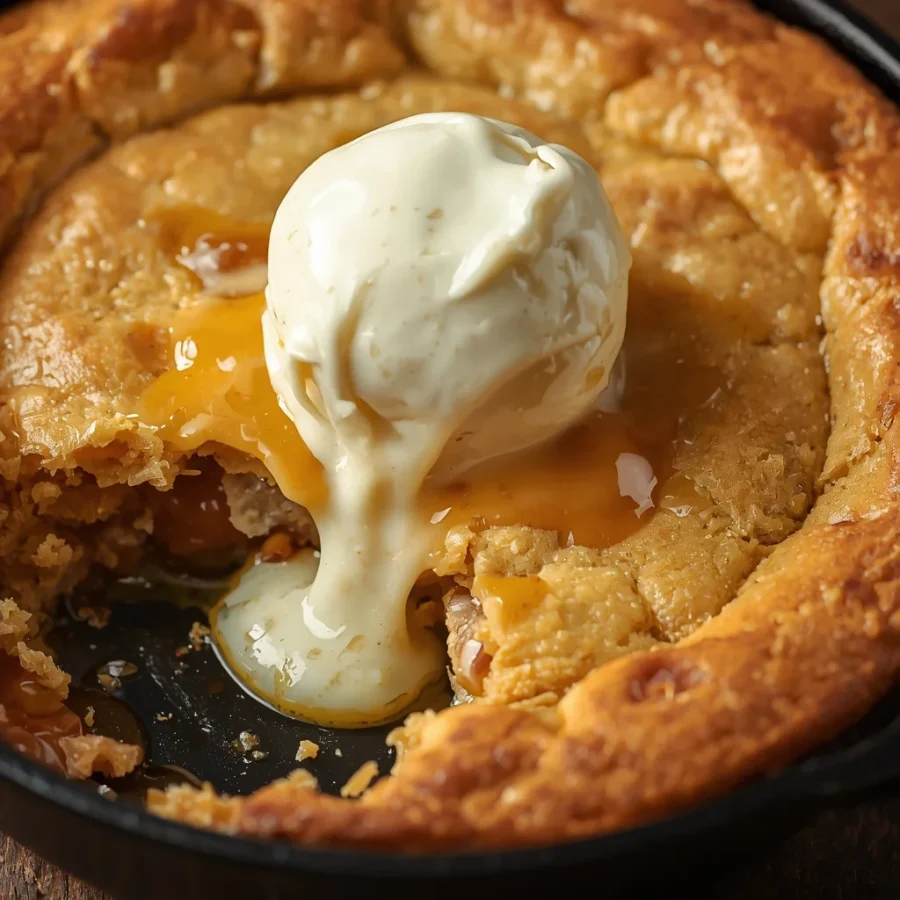
Whether you choose to share it straight out of the pan with a crowd of friends or slice it neatly onto individual plates topped with clouds of melting vanilla ice cream, this recipe is guaranteed to become a permanent favorite in your baking repertoire. Gather your ingredients, warm up your favorite cast iron, and enjoy the ultimate comfort food experience tonight.
Print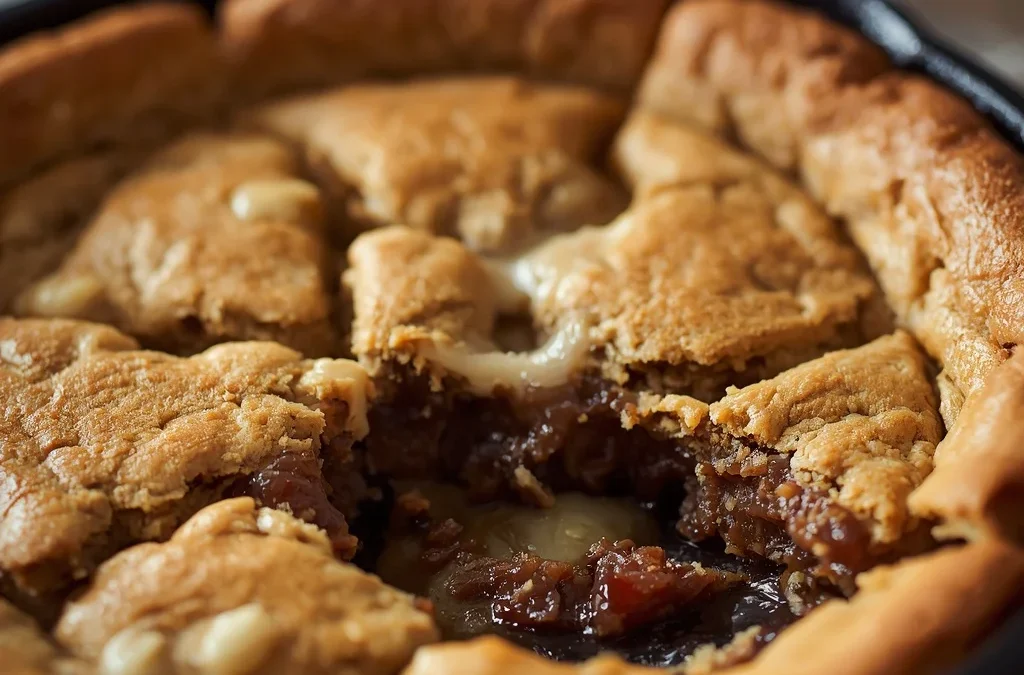
The Ultimate Gooey Deep-Dish Skillet Cookie Recipe
- Total Time: 45 minutes
- Yield: 10 servings 1x
- Diet: Vegetarian
Description
To truly appreciate this dessert, it helps to understand exactly what sets a gooey deep-dish skillet cookie apart from standard baked goods. Often referred to in casual dining circles as a “pizookie” (a portmanteau of pizza and cookie), this dish takes traditional chocolate chip dough and packs it into a heavy skillet rather than portioning it onto flat baking sheets.
Ingredients
- 1/2 cup (115 g) unsalted butter, melted and slightly cooled
- 1/2 cup (100 g) brown sugar
- 1/4 cup (50 g) granulated sugar
- 1 large egg
- 1 teaspoon vanilla extract
- 1 1/4 cups (155 g) all-purpose flour
- 1/2 teaspoon baking soda
- 1/2 teaspoon salt
- 1 cup (170 g) chocolate chips or chunks
- Optional: 1/2 cup chopped walnuts or pecans
- Flaky sea salt for topping
Instructions
- Preheat your oven to 350°F (175°C).
- Grease an 8-inch or 10-inch oven-safe skillet.
- In a bowl, whisk together the melted butter, brown sugar, and granulated sugar until smooth.
- Mix in the egg and vanilla.
- Add the flour, baking soda, and salt. Stir just until combined.
- Fold in the chocolate chips and nuts (if using).
- Press the dough evenly into the skillet.
- Sprinkle a pinch of flaky sea salt on top.
- Bake for 25–30 minutes, until the edges are golden but the center still looks slightly underbaked.
- Let cool for 10–15 minutes before serving.
Notes
This deep-dish skillet cookie combines crispy golden edges with a rich, soft center loaded with chocolate. It’s an easy dessert that feels special enough for any occasion.
- Prep Time: 15 minutes
- Cook Time: 30 minutes
- Category: Dessert
- Method: Baking
- Cuisine: American
Nutrition
- Serving Size: 1 slice (1/10 of skillet)
- Calories: 320 kcal
Keywords: cast-iron skillet cookie, deep-dish cookie cake, warm skillet pizookie