

What is That Recipe?
Origin of Santa Hat Cookies
Ingredients with Quantity: Santa Hat Cookies
For the Sugar Cookie Base
-
All-purpose flour: Two and one-half cups (three hundred fifteen grams)
-
Unsalted butter (softened): One-half cup (one hundred fifteen grams)
-
Granulated sugar: Three-quarters cup (one hundred fifty grams)
-
Large egg: One room-temperature egg
-
Vanilla extract: One teaspoon
-
Baking powder: One-half teaspoon
-
Salt: One-fourth teaspoon
Red Santa Hat Icing
-
Powdered sugar: Two cups (two hundred forty grams)
-
Milk or water: Two to three tablespoons (adjusted as needed for consistency)
-
Vanilla extract: One-half teaspoon
-
Red gel food coloring: As needed to achieve a deep, bright red shade
For the White Hat Trim and Pom-Pom
-
Powdered sugar: One-half cup (sixty grams)
-
Milk: One to two tablespoons
-
Vanilla extract: One-fourth teaspoon
-
Alternative option: Thick vanilla buttercream or white decorating icing provides a raised, fluffy texture
Step by Step Direction and Preparation Method: Santa Hat Cookies
Preparing the Sugar Cookie Dough
-
Combine the softened unsalted butter and granulated sugar inside a large bowl.
-
Beat the mixture using an electric hand mixer on medium speed for about two minutes. The texture should turn light, pale, and thoroughly creamed.
-
Crack in the room-temperature egg next. Pour in the vanilla extract immediately.
-
Continue beating on medium speed. The wet ingredients must incorporate completely until smooth.
-
Sift and whisk the all-purpose flour, baking powder, and salt together inside a separate medium bowl. This ensures even distribution of the leavening agent.
-
Pour the dry flour mixture into the creamed butter in three separate additions. Mix on low speed after each addition. A cohesive, soft dough will form without overworking.
-
Gather the dough using clean hands. Shape it into a flat, smooth disc.
-
Wrap this disc tightly in plastic wrap. Refrigerate the wrapped dough for at least thirty minutes so the butter firms up.
Shaping the Santa Hats
-
Preheat your baking oven to three hundred fifty degrees Fahrenheit (one hundred seventy-five degrees Celsius). Line two large baking sheets with parchment paper.
-
Retrieve the chilled dough disc from the refrigerator. Place it onto a clean, lightly floured work surface.
-
Roll out the dough using a floured rolling pin. Aim for a uniform thickness of approximately one-fourth of an inch (six millimeters).
-
Cut the rolled dough into neat triangles using a sharp knife. Give the corners slightly rounded edges so they resemble festive hats.
-
Lift each cut piece gently with a flat spatula. Arrange them onto your prepared baking sheet. Leave about one inch of space between adjacent cookies to allow proper heat circulation.
-
Gather remaining dough scraps. Re-roll them gently and cut additional shapes until zero dough remains.
Baking and Cooling
-
Slide the baking sheets onto the middle oven rack. Bake for ten to twelve minutes.
-
Monitor the baking process closely near the end of the timer. You want the cookies to set completely while keeping the surface pale. The bottom edges should turn just slightly light golden.
-
Pull the sheets from the oven. Let the hot cookies rest undisturbed on the warm tray for five minutes. This allows their internal structure to firm up.
-
Transfer the cookies carefully onto a wire rack using a spatula. Leave them to cool completely to room temperature before applying any decorations.
Mixing the Vibrant Red Icing
-
Measure two cups of sifted powdered sugar into a clean mixing bowl.
-
Pour in two tablespoons of milk or water along with one-half teaspoon of vanilla extract. Whisk vigorously until smooth.
-
Adjust the consistency if needed. Add extra liquid a few drops at a time to achieve a thick yet spreadable glaze.
-
Drop concentrated red gel food coloring into the bowl slowly. Whisk continuously until you reach a vivid, classic Santa-red shade.
Decorating the Santa Hats
-
Fit a piping bag with a small round tip. Fill it with the glossy red icing.
-
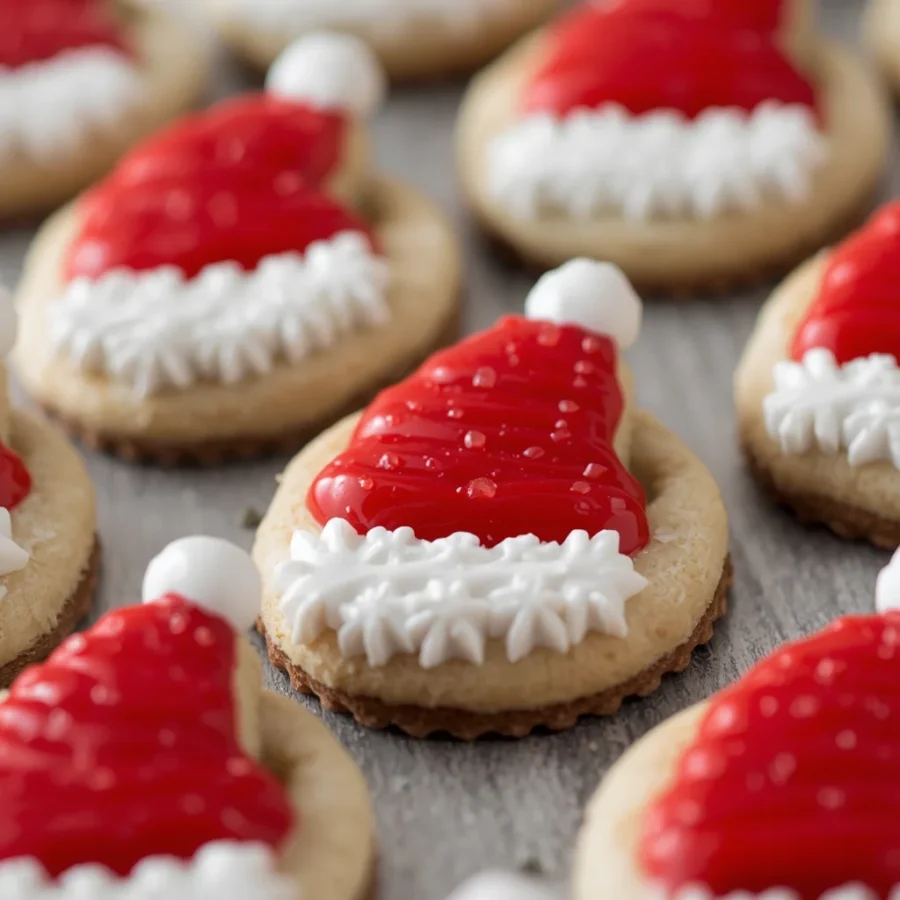
Outline and fill the main triangular portion of each cooled cookie. Leave a clean gap at the bottom base for the white trim.
-
Combine one-half cup powdered sugar, one to two tablespoons of milk, and one-fourth teaspoon vanilla extract in a separate small bowl. This creates a thick white icing.
-
Pipe a thick, textured horizontal band along the bottom base of each hat. This creates the look of fluffy faux fur.
-
Squeeze a generous, rounded dollop of white icing at the top apex point of the triangle to form the signature fluffy pom-pom.
-
Set the decorated cookies on a flat rack at room temperature. Leave them alone for one to two hours so the icing layer dries, hardens, and sets completely before serving.
Variations for Creative Flavors and Designs
Peppermint Sugar Cookie Variation
Cream Cheese Buttercream Topping
Gluten-Free Sugar Cookie Adaptation
Secret Techniques for Flawless Cookie Decorating
Preventing Dough Distortion and Spreading
Pro Tips for the Best Holiday Cookie Prep: Santa Hat Cookies
-
Chill the dough thoroughly because cold dough retains its detailed shape far better in the oven.
-
Use room temperature eggs since cold eggs cause melted butter to re-solidify into tiny chunks.
-
Cool cookies completely before decorating to prevent royal glaze or buttercream frosting from melting.
-
Invest in gel colors for vibrant depth with just a fraction of a drop.
-
Add festive sparkle by dusting edible glitter over the white trim while wet.
Storage and Freezing Guidelines: Santa Hat Cookies
-
Room temperature storage requires fully set and hardened icing. Store cookies in a single layer separated by parchment paper inside an airtight container for four to five days.
-
Refrigeration becomes necessary if you choose perishable cream cheese frosting or fresh buttercream. Seal cookies in a tight container inside the refrigerator for up to one week.
-
Freezing undecorated baked cookies extends longevity. Stack completely cooled cookies inside a freezer-safe container separated by parchment paper for up to two months.
-
Freezing raw cookie dough offers a great time-saving option. Wrap the raw dough disc tightly in two layers of plastic wrap and freeze for up to three months.
FAQs About Santa Hat Cookies: Santa Hat Cookies
Why did my red icing turn pink instead of vibrant red?
Can I use store-bought sugar cookie dough to save time?
How long does it take for the red icing glaze to set completely?
My sugar cookie dough is too crumbly to roll out, what should I do?
Can I make Santa Hat Cookies with chocolate dough instead of vanilla?
Conclusion: Santa Hat Cookies

Santa Hat Cookies
- Total Time: 1 hour 37 minutes
- Yield: 20 cookies 1x
- Diet: Vegetarian
Description
The Santa Hat Cookies recipe is a creative holiday baking treat. It transforms basic sugar cookie dough into iconic, triangle-shaped festive hats. Fluffy white fur trims and sweet pom-poms complete the look. Unlike simple round sugar cookies, this variation focuses on clean geometric shaping. Colorful icing applications produce an eye-catching, edible work of art.
Ingredients
For the sugar cookies
-
2½ cups (315 g) all-purpose flour
-
½ cup (115 g) unsalted butter, softened
-
¾ cup (150 g) granulated sugar
-
1 large egg
-
1 tsp vanilla extract
-
½ tsp baking powder
-
¼ tsp salt
For the red Santa hat icing
-
2 cups (240 g) powdered sugar
-
2–3 tbsp milk or water
-
½ tsp vanilla extract
-
Red gel food coloring, as needed
For the white hat trim and pom-pom
-
½ cup (60 g) powdered sugar
-
1–2 tbsp milk
-
¼ tsp vanilla extract
Alternatively, use white decorating icing or a thick vanilla buttercream for the trim.
Instructions
Step 1: Make the cookie dough
-
In a large bowl, beat the softened butter and granulated sugar until light and creamy.
-
Add the egg and vanilla extract. Mix until combined.
-
In another bowl, whisk together the flour, baking powder, and salt.
-
Gradually add the dry ingredients to the butter mixture, mixing until a soft dough forms.
-
Shape the dough into a disc, wrap it, and refrigerate for 30 minutes.
Step 2: Shape the Santa hats
-
Preheat the oven to 175°C (350°F). Line a baking tray with parchment paper.
-
Roll the chilled dough on a lightly floured surface to about ¼ inch (6 mm) thick.
-
Cut the dough into triangles with slightly rounded corners to resemble Santa hats.
-
Arrange the cookies on the prepared tray, leaving about 1 inch between them.
Step 3: Bake the cookies
-
Bake for 10–12 minutes, until the edges are just beginning to turn lightly golden.
-
Let the cookies cool on the tray for 5 minutes.
-
Transfer to a wire rack and allow them to cool completely before decorating.
Step 4: Prepare the red icing
-
Place the powdered sugar in a bowl.
-
Add 2 tablespoons of milk or water and the vanilla extract.
-
Stir until smooth, adding a few drops of liquid if needed to achieve a thick but spreadable consistency.
-
Add red gel food coloring gradually until you reach a bright Santa-red shade.
Step 5: Decorate the Santa hats
-
Spread or pipe the red icing over the triangular portion of each cooled cookie, leaving the bottom edge uncovered for the white trim.
-
Mix the separate powdered sugar, milk, and vanilla to make the white icing.
-
Pipe a thick white band along the bottom of each hat.
-
Add a small round dollop of white icing at the tip of each triangle to create the pom-pom.
-
Leave the cookies at room temperature until the icing is set, about 1–2 hours.
Notes
Arrange the cookies on a Christmas platter with gingerbread men, snowflake cookies, and hot chocolate for a cheerful holiday dessert spread.
- Prep Time: 25 minutes
- Cook Time: 12 minutes
- Category: Dessert
- Method: Baking
- Cuisine: American
Nutrition
- Serving Size: 1 cookie
- Calories: 165 kcal
Keywords: Christmas Santa Hat Cookies, Festive Santa Hat Sugar Cookies, Holiday Santa Hat Treats
