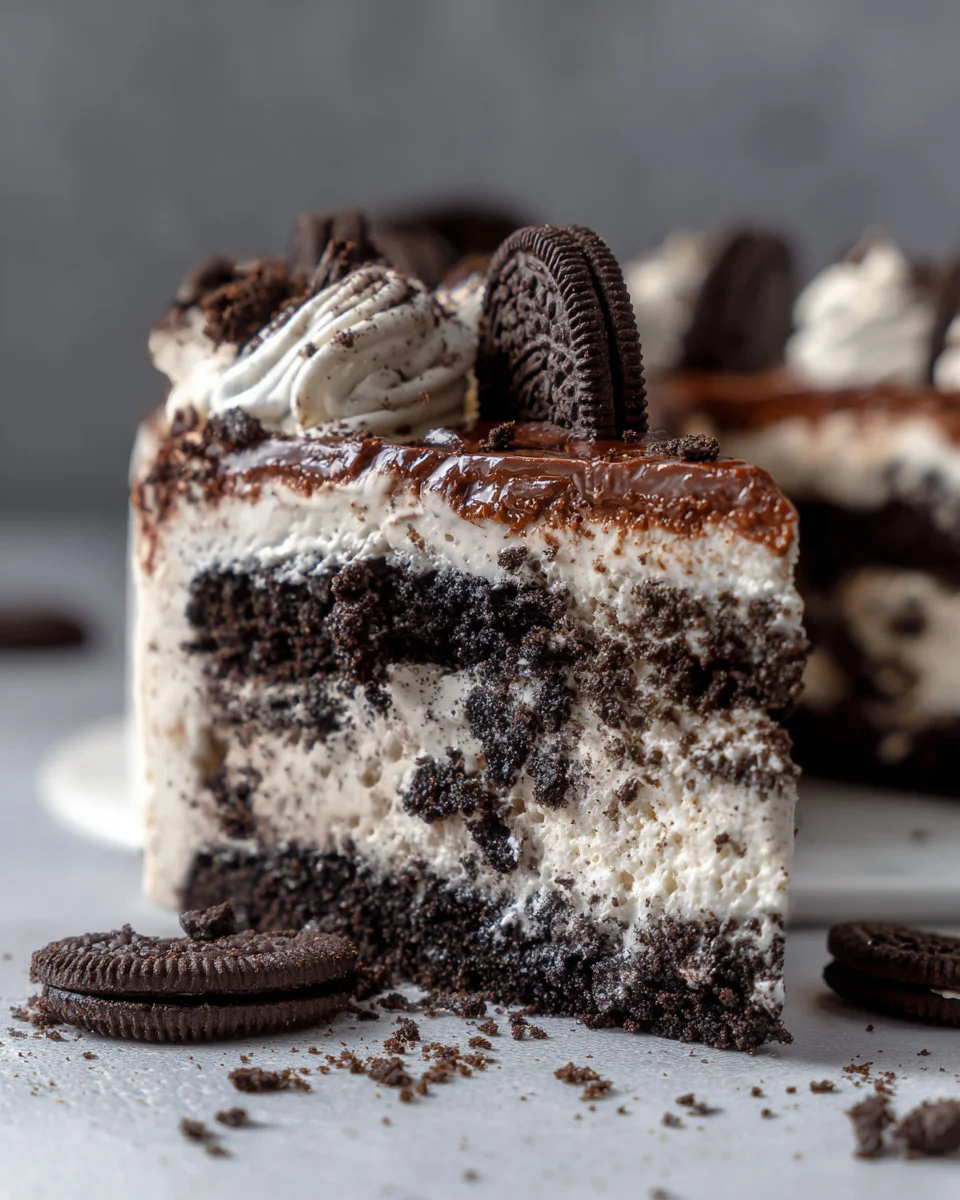
If you are a fan of rich, milky desserts and the classic crunch of chocolate sandwich cookies, you are in for an absolute treat. This easy version of a Cookies and Cream Milk Cake combines the ultra-moist, luxurious texture of a traditional tres leches dessert with the nostalgic, beloved flavors of cream-filled chocolate cookies. Imagine a light, fluffy sponge cake completely infused with a sweet, creamy three-milk mixture that has been infused with crushed cookies, then finished with a cloud of whipped cream. It is the ultimate crowd-pleasing dessert that feels incredibly gourmet but requires very little effort to pull off in your own kitchen.
Whether you are hosting a casual weekend gathering, celebrating a special occasion, or simply treating your family to a spectacular weekend baking project, this Cookies and Cream Milk Cake is guaranteed to steal the show. By following a few simple steps, you will create a dessert that surpasses anything you could buy at a high-end bakery. Let us dive deep into what makes this particular cake so magical, where the concept comes from, and exactly how you can recreate it perfectly at home.
What is a Cookies and Cream Milk Cake?
At its core, a Cookies and Cream Milk Cake is a modern, cookie-infused spin on the classic Latin American dessert known as tres leches. A traditional milk cake relies on a sponge cake base that is intentionally baked to be light and airy. This specific texture is crucial because the cake essentially acts like a sponge, waiting to absorb a rich bath of different dairy products.
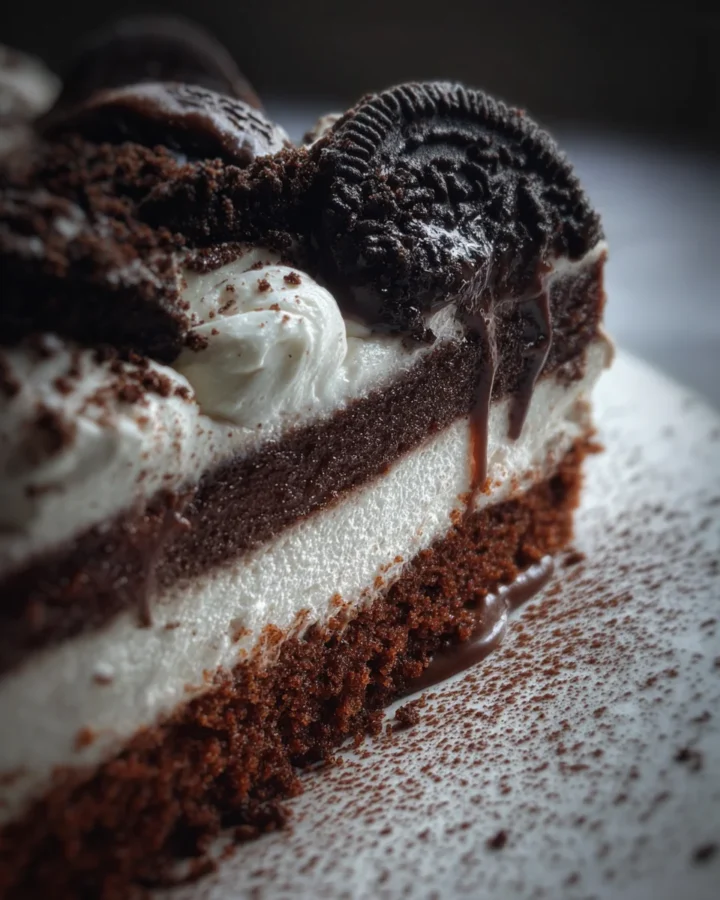
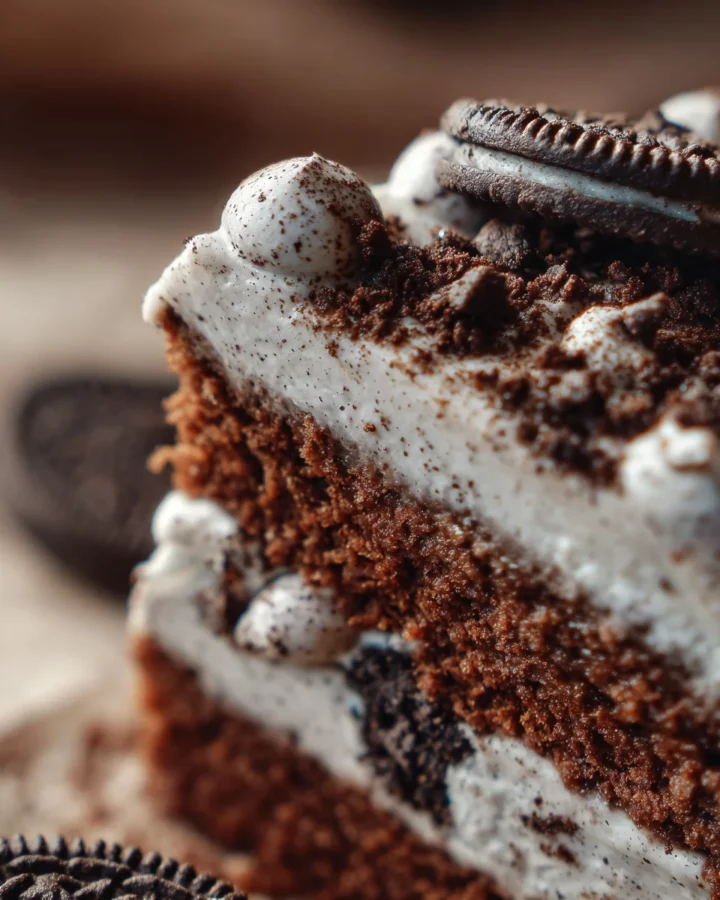
What elevates this recipe to a whole new level of indulgence is the integration of crushed chocolate sandwich cookies. Instead of just soaking the cake in plain sweet milks, we infuse the milk mixture with deeply chocolatey, cream-filled cookies. As the cake sits and chills, it draws in all that milky goodness while the cookie pieces soften into pockets of pure bliss. Every single bite delivers a perfect balance of vanilla sponge, velvety whipped cream, and chocolate cookie richness.
Why This Easy Version Works So Well
Many gourmet cake recipes require complex layering, precise frosting techniques, and hours of tedious assembly. This recipe strips away all of that stress without sacrificing a single drop of flavor or presentation value. Because the cake is baked, soaked, and served right out of the same baking dish, you do not have to worry about layers shifting or frosting melting.
Furthermore, the ingredients are incredibly straightforward and accessible. You do not need any exotic baking supplies or advanced culinary tools to achieve a professional result. The simplicity of the baking method combined with the foolproof nature of the milk soak ensures that even novice bakers can achieve a perfectly moist, flavorful cake on their very first try.
The Origin of Milk Cakes and Cookie Trends
To truly appreciate this Cookies and Cream Milk Cake, it helps to understand the culinary history that inspired it. The concept of soaking cakes in liquid is centuries old, with roots tracing back to European desserts like British trifles and Italian tiramisu. However, the specific method of using three distinct types of milk gained massive popularity in Latin America during the middle of the twentieth century.
Originally, corporate recipe promotions helped popularize the use of canned evaporated and condensed milks because they were shelf-stable and added an unparalleled richness to baked goods. Over the decades, the tres leches style spread globally, capturing the hearts of dessert lovers everywhere.
The Rise of the Cookies and Cream Flavor Profile
While the milk cake concept belongs to traditional baking heritage, the cookies and cream flavor profile is a brilliant product of modern snack culture. Introduced to the world over a century ago, chocolate sandwich cookies with cream fillings became an international phenomenon. It did not take long for creative bakers to realize that these cookies belonged in more than just a glass of cold milk.
Ice cream makers, donut shops, and pastry chefs quickly adopted the flavor combination, turning it into a staple of modern confectionery. Merging the deeply nostalgic, comforting crunch of chocolate cookies with the luxurious, melt-in-your-mouth texture of a traditional soaked milk cake was a natural evolution. The result is a fusion dessert that honors old-world baking techniques while celebrating contemporary flavor trends.
Ingredients for Your Cookies and Cream Milk Cake
Before you begin baking, it is important to gather your ingredients and ensure they are properly measured. Using fresh, high-quality dairy and standard pantry staples will guarantee the best possible texture and flavor for your Cookies and Cream Milk Cake.
For the Sponge Cake Base
The foundation of this dessert needs to be sturdy enough to hold a large volume of liquid, yet delicate enough to remain tender and light.
-
All-Purpose Flour: One cup, which translates to roughly one hundred and twenty-five grams. This provides the structure for our sponge.
-
Baking Powder: One teaspoon to give the cake the perfect amount of lift and airiness.
-
Salt: One-quarter of a teaspoon to balance the sweetness of the sugar and dairy.
-
Eggs: Three large eggs at room temperature. The eggs are vital for creating a fluffy, stable crumb structure.
-
Sugar: Three-quarters of a cup, or one hundred and fifty grams, of granulated white sugar to sweeten the sponge.
-
Milk: One-third of a cup, or eighty milliliters, of whole milk to add moisture to the initial batter.
-
Melted Butter: One-quarter of a cup, equivalent to sixty grams, of unsalted butter to add wealth and a tender mouthfeel.
-
Vanilla Extract: One teaspoon of high-quality pure vanilla extract for that classic bakery aroma.
For the Decadent Milk Soak
This is where the magic happens. The three-milk blend infuses every crumb of the cake with rich flavor and an incredibly moist texture.
-
Evaporated Milk: One cup, or two hundred and forty milliliters. This unsweetened condensed milk provides a deep, concentrated dairy flavor.
-
Condensed Milk: One-half of a cup, or one hundred and twenty milliliters. This thick, sweet milk provides the necessary sweetness and body to the soak.
-
Heavy Cream or Whipping Cream: One-half of a cup, or one hundred and twenty milliliters, to add a velvety, luxurious smoothness to the liquid blend.
-
Chocolate Sandwich Cookies: Eight to ten classic cookies, completely crushed. These will infuse their chocolate and cream essence directly into the liquid.
For the Gorgeous Topping and Garnish
The final layer adds contrast, lightness, and a beautiful visual appeal to the finished dessert.
-
Whipped Cream: One cup of heavily whipped cream to create a fluffy, cloud-like blanket over the soaked cake.
-
Crushed Chocolate Sandwich Cookies: Four to six cookies, coarsely crushed, to sprinkle over the top for a bit of texture.
-
Extra Cookie Pieces: A handful of whole or halved cookies to use as an elegant garnish just before serving.
Step-by-Step Direction and Preparation Method: Cookies and Cream Milk Cake
Now that your ingredients are gathered and ready, it is time to start baking. Follow these detailed steps carefully to ensure your Cookies and Cream Milk Cake turns out absolutely flawless.
Preparing Your Kitchen and Baking Pan
Before mixing any ingredients, you want to set your kitchen up for success. Start by heating your oven to one hundred and seventy-five degrees Celsius, which is equivalent to three hundred and fifty degrees Fahrenheit. Let the oven preheat thoroughly so that your cake bakes evenly from the moment it goes inside.
Next, prepare your baking pan. You will need an eight-inch square or round baking pan. Take a small amount of butter or non-stick cooking spray and thoroughly grease the bottom and sides of the pan. To make serving even easier, you can line the bottom of the pan with a piece of parchment paper. This prevents any sticking and ensures a clean presentation.
Mixing the Cake Batter
Creating a light sponge relies heavily on how you handle the ingredients.
-
Combine the Dry Ingredients: In a medium-sized mixing bowl, combine your all-purpose flour, baking powder, and salt. Use a wire whisk to stir them together for about thirty seconds. This ensures the baking powder is evenly distributed through the flour, preventing any uneven rising during the baking process. Set this bowl aside.
-
Beat the Eggs and Sugar: In a separate, larger bowl, crack your three room-temperature eggs and add the sugar. Using an electric hand mixer or a stand mixer fitted with the whisk attachment, beat the eggs and sugar together on medium-high speed. You want to continue beating for several minutes until the mixture becomes very pale, thick, and noticeably fluffy. This step incorporates vital air into the batter.
-
Introduce the Liquids: Turn your mixer down to a low speed. Slowly pour in the one-third cup of milk, the melted butter, and the vanilla extract. Mix just until the liquids are combined with the egg mixture. Be careful not to overmix at this stage, as you do not want to deflate all the air you just whipped into the eggs.
-
Fold in the Flour: Put away your electric mixer and grab a rubber spatula. Gently dump your dry ingredients into the wet mixture. Using a slow, sweeping motion, fold the flour into the liquid. Cut down through the center, sweep around the bottom of the bowl, and fold the batter over itself. Continue doing this just until the streaks of flour disappear. Overmixing here will develop gluten, resulting in a tough cake rather than a tender sponge.
Baking the Sponge to Perfection
Carefully pour your smooth cake batter into the prepared eight-inch baking pan. Use your spatula to smooth out the top surface so it bakes evenly. Place the pan on the center rack of your preheated oven.
Bake the cake for twenty-five to thirty minutes. You will know it is done when the top turns a beautiful golden brown color and the edges begin to pull away slightly from the sides of the pan. To be absolutely certain, insert a clean toothpick or a wooden skewer into the very center of the cake. If it comes out clean or with just a few dry crumbs attached, your cake is fully baked.
Remove the pan from the oven and place it on a wire cooling rack. Let the cake cool inside the pan for about ten minutes. You want the cake to remain warm, but not piping hot, when you apply the milk soak.
Crafting the Cookie-Infused Milk Mixture
While your cake is cooling for those ten minutes, you can quickly put together the luxurious liquid soak.
In a large measuring cup or a bowl with a pouring spout, combine the evaporated milk, sweet condensed milk, and heavy cream. Use a whisk to stir them together until they form a completely smooth, homogenous liquid.
Next, take your eight to ten chocolate sandwich cookies and crush them into small pieces. You can do this by placing them in a plastic zip-top bag and gently rolling over them with a rolling pin. Stir the crushed cookies directly into the milk mixture. Let this blend sit quietly for about five minutes. This brief resting period allows the dry cookie pieces to soften up and release their deep chocolate flavor directly into the cream.
Soaking the Cake for Maximum Moisture
Now comes the most satisfying part of making a Cookies and Cream Milk Cake. Grab a fork or a long wooden skewer. Take your warm cake and poke holes over the entire surface. Make sure to poke all the way down to the bottom of the pan, spacing the holes about half an inch apart. These holes act as channels that allow the milk mixture to penetrate deep into the center of the sponge.
+-----------------------------------+
|  *   *   *   *   *   *   *   *   *  |  <- Poke holes evenly
|  *   *   *   *   *   *   *   *   *  |     across the entire
|  *   *   *   *   *   *   *   *   *  |     warm sponge cake.
+-----------------------------------+
Slowly and evenly pour the cookie-infused milk mixture over the top of the cake. It might look like a lot of liquid at first, and the cake may briefly look flooded, but do not worry. The warm sponge will eagerly drink up the sweet liquid.
Once all the milk is poured over, cover the pan tightly with plastic wrap or aluminum foil. Transfer the cake directly into your refrigerator. It needs to chill and absorb the liquid for a bare minimum of three to four hours. However, if you want the absolute best results, let it sit in the refrigerator overnight. This extended time allows the flavors to mature and gives the cake a melt-in-your-mouth consistency.
Decorating and Final Garnishes
Once your cake has thoroughly chilled and absorbed every drop of the milk mixture, it is time for the final touches. Remove the plastic wrap from your pan.
Take your cup of whipped cream and spread it evenly across the top of the cold cake, using a spatula or the back of a large spoon to create beautiful, rustic swirls.
Sprinkle the four to six coarsely crushed chocolate sandwich cookies evenly over the whipped cream layer. For a truly professional look, take a few extra whole or broken cookie pieces and artfully arrange them as a garnish on top. Your masterpiece is now complete and ready to be sliced and enjoyed.
Flavorful Variations to Try: Cookies and Cream Milk Cake
Once you have mastered the classic version of this Cookies and Cream Milk Cake, you might want to experiment with different flavor profiles to surprise your guests. The beauty of this recipe lies in its adaptability.
The Double Chocolate Explosion
If you are someone who believes there can never be too much chocolate, this variation is for you. You can substitute the standard vanilla sponge cake for a rich chocolate sponge by replacing two tablespoons of the all-purpose flour with high-quality unsweetened cocoa powder. Additionally, you can drizzle a generous amount of dark chocolate syrup over the finished whipped cream layer before serving.
Peanut Butter and Cream Twist
Chocolate and peanut butter are a match made in culinary heaven. To bring this classic combination into your milk cake, you can whisk two tablespoons of smooth peanut butter into the warm milk mixture before pouring it over the cake. You can also use peanut-butter-flavored cream sandwich cookies instead of the traditional vanilla-filled ones to completely transform the flavor profile.
Mint Cookies and Cream Refreshment
For a bright, refreshing after-dinner dessert, consider making a mint version. Swap out the traditional chocolate sandwich cookies for mint-flavored cream cookies in both the milk soak and the topping. You can also add a tiny drop of pure peppermint extract to the whipped cream topping to give it an extra cool, crisp finish that pairs beautifully with the rich dairy.
Pro Tips for the Best Results
To ensure your cake turns out even better than the ones you see in professional bakery windows, keep these expert tips in mind while you work through the recipe.
Temperature Matters: Always ensure your eggs and milk for the cake batter are at room temperature before you start mixing. Room temperature eggs trap air much more efficiently than cold eggs, resulting in a lighter, fluffier sponge cake that absorbs the milk mixture perfectly.
-
Do Not Rush the Chilling Process: It can be incredibly tempting to slice into the cake early, but patience is key here. The cake needs those hours in the refrigerator not just to get cold, but to allow the proteins and starches in the cake to lock in the liquid. Cutting it too early will cause the milk to pool out at the bottom of the plate.
-
Keep the Topping Fresh: If you are making this cake a day in advance, wait to add the whipped cream and the final cookie garnish until shortly before you plan to serve it. This keeps the whipped cream looking perfectly fluffy and prevents the topping cookies from getting overly soft before your guests can enjoy them.
-
Add a Touch of Salt: As mentioned in the serving tips, a tiny pinch of flaky sea salt scattered over the final whipped cream layer can work wonders. The salt cuts through the intense sweetness of the condensed milk and heightens the deep cocoa flavors of the chocolate cookies.
Frequently Asked Questions: Cookies and Cream Milk Cake
Can I make Cookies and Cream Milk Cake ahead of time?
Yes, this is actually an incredible dessert for meal prepping or entertaining because it tastes significantly better when made in advance. You can easily bake and soak the cake twenty-four hours before your event. Just keep it covered in the refrigerator, and then add the fresh whipped cream and cookie garnishes right before your guests arrive.
Why is my milk cake soggy instead of moist?
A great milk cake should be incredibly moist and juicy, but it should not disintegrate into mush. If your cake feels unpleasantly soggy, it usually means the sponge cake base was either underbaked or did not have enough air whipped into the eggs during the initial mixing phase. A properly baked, airy sponge has a strong structure that holds onto the liquid while maintaining its shape.
Can I use homemade whipped cream instead of store-bought?
Absolutely. Homemade whipped cream is highly recommended for this recipe because you can control the sweetness. Since the milk soak is already quite sweet due to the condensed milk, you can whip your heavy cream with very little sugar, or even leave it completely unsweetened. This creates a wonderful, balanced contrast with the sweet cake beneath it.
How long will leftovers keep in the refrigerator?
If you happen to have any leftovers, you can store them in an airtight container in the refrigerator for up to three to four days. Because the cake is thoroughly soaked in milk, it will not dry out like a traditional cake does. Just note that the cookie pieces used for the garnish will continue to soften the longer they sit on the whipped cream.
Can I freeze a milk cake?
It is not recommended to freeze the cake after you have poured the milk mixture over it. The freezing and thawing process can disrupt the delicate dairy emulsion in the soak, causing the liquid to separate and making the sponge cake lose its ideal texture. This cake is best enjoyed fresh from the refrigerator.
Conclusion: Cookies and Cream Milk Cake
Creating a spectacular dessert at home does not require complicated techniques or hours of stressful assembly. This easy version of a Cookies and Cream Milk Cake proves that with a few simple pantry staples and a clever flavor twist, you can create a truly unforgettable sweet treat. By combining the time-tested technique of a classic three-milk soak with the deeply comforting flavor of chocolate sandwich cookies, you get a dessert that offers the absolute best of both worlds. It is incredibly moist, perfectly sweet, and packed with textures that will leave everyone at your table asking for a second slice. Gather your ingredients, follow the steps, and enjoy the process of creating a bakery-quality dessert right in the comfort of your own kitchen.
Print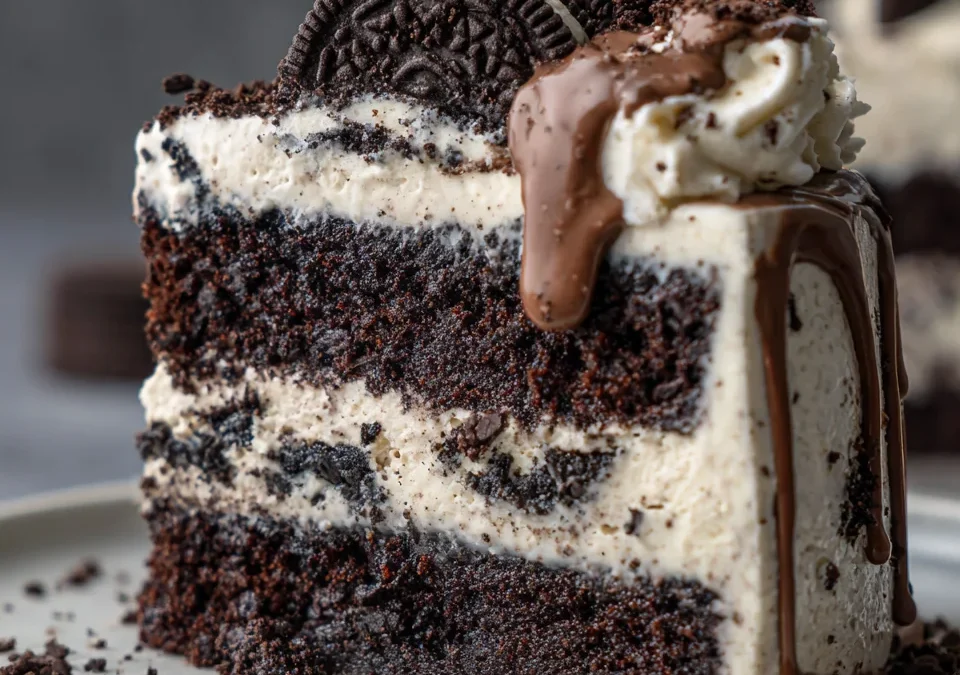
The Ultimate Cookies and Cream Milk Cake Recipe
- Total Time: 50 minutes (+ 4 hours chilling)
- Yield: 10 servings 1x
- Diet: Vegetarian
Description
At its core, a Cookies and Cream Milk Cake is a modern, cookie-infused spin on the classic Latin American dessert known as tres leches. A traditional milk cake relies on a sponge cake base that is intentionally baked to be light and airy. This specific texture is crucial because the cake essentially acts like a sponge, waiting to absorb a rich bath of different dairy products.
Ingredients
For the cake:
- 1 cup (125 g) all-purpose flour
- 1 tsp baking powder
- ¼ tsp salt
- 3 eggs
- ¾ cup (150 g) sugar
- ⅓ cup (80 ml) milk
- ¼ cup (60 g) melted butter
- 1 tsp vanilla extract
Milk soak:
- 1 cup (240 ml) evaporated milk
- ½ cup (120 ml) condensed milk
- ½ cup (120 ml) heavy cream or whipping cream
- 8–10 chocolate sandwich cookies (such as Oreo), crushed
Topping:
- 1 cup whipped cream
- 4–6 crushed chocolate sandwich cookies
- Extra cookie pieces for garnish
Instructions
- Prepare the cake
- Preheat oven to 175°C (350°F).
- Grease and line an 8-inch (20 cm) square or round baking pan.
- Make the batter
- Whisk flour, baking powder, and salt together.
- In another bowl, beat eggs and sugar until pale and fluffy.
- Mix in milk, melted butter, and vanilla.
- Fold in the dry ingredients until just combined.
- Bake
- Pour batter into the prepared pan.
- Bake for 25–30 minutes, or until a toothpick comes out clean.
- Let the cake cool for about 10 minutes.
- Prepare the milk mixture
- Mix evaporated milk, condensed milk, heavy cream, and crushed cookies.
- Stir well and let sit for 5 minutes so the cookies soften slightly.
- Soak the cake
- Poke holes all over the warm cake with a fork or skewer.
- Slowly pour the milk mixture over the cake.
- Refrigerate for at least 3–4 hours (overnight is even better).
- Decorate
- Spread whipped cream over the chilled cake.
- Sprinkle with crushed cookies and garnish with extra cookie pieces.
Notes
Every bite of this Cookies & Cream Milk Cake melts in your mouth with a delicious blend of creamy milk soak and crunchy cookie crumbs. Serve chilled and enjoy!
- Prep Time: 20 minutes
- Cook Time: 30 minutes
- Category: Dessert
- Method: Baking
- Cuisine: American
Nutrition
- Serving Size: 1 slice
- Calories: 420 kcal
Keywords: Easy Cookies and Cream Cake, Oreo Tres Leches Cake, Cookies and Cream Dessert