Imagine taking a bite into a pastry so crisp and flaky that it shatters delightfully, immediately followed by the rich, deep warmth of perfectly caramelized fruit or bubbling savory cheese. It sounds like something you would only find in the window of a high-end European bakery, but you can actually make it right in your own kitchen with minimal effort. This is the magic of upside-down puff pastry tarts. This viral baking technique has taken the culinary world by storm because it completely flips the traditional method of baking on its head, quite literally, to deliver restaurant-quality results with almost zero stress.
For anyone who loves hosting brunch, needs a quick yet elegant dessert for a dinner party, or simply wants a comforting weekend baking project, this recipe is a total revelation. You do not need an advanced culinary degree or hours of free time to pull this off. By utilizing a few clever kitchen shortcuts and understanding how heat transforms simple sugar and fat, you can create a stunning visual masterpiece that tastes even better than it looks. Let us explore why these upside-down puff pastry tarts have become an absolute sensation and how you can master them perfectly on your first try.
What is This Recipe All About
At its absolute core, this dish is a brilliant exercise in rustic French-style baking, heavily inspired by classical methodology but streamlined for the modern home cook. Instead of building a pastry inside a traditional pie dish or tart pan where the crust sits on the bottom and the toppings sit on top, this method completely reverses the spatial dynamics. You arrange your sweet or savory toppings directly onto a lined baking sheet first, and then drape a sheet of pre-cut pastry over the top like a cozy blanket.
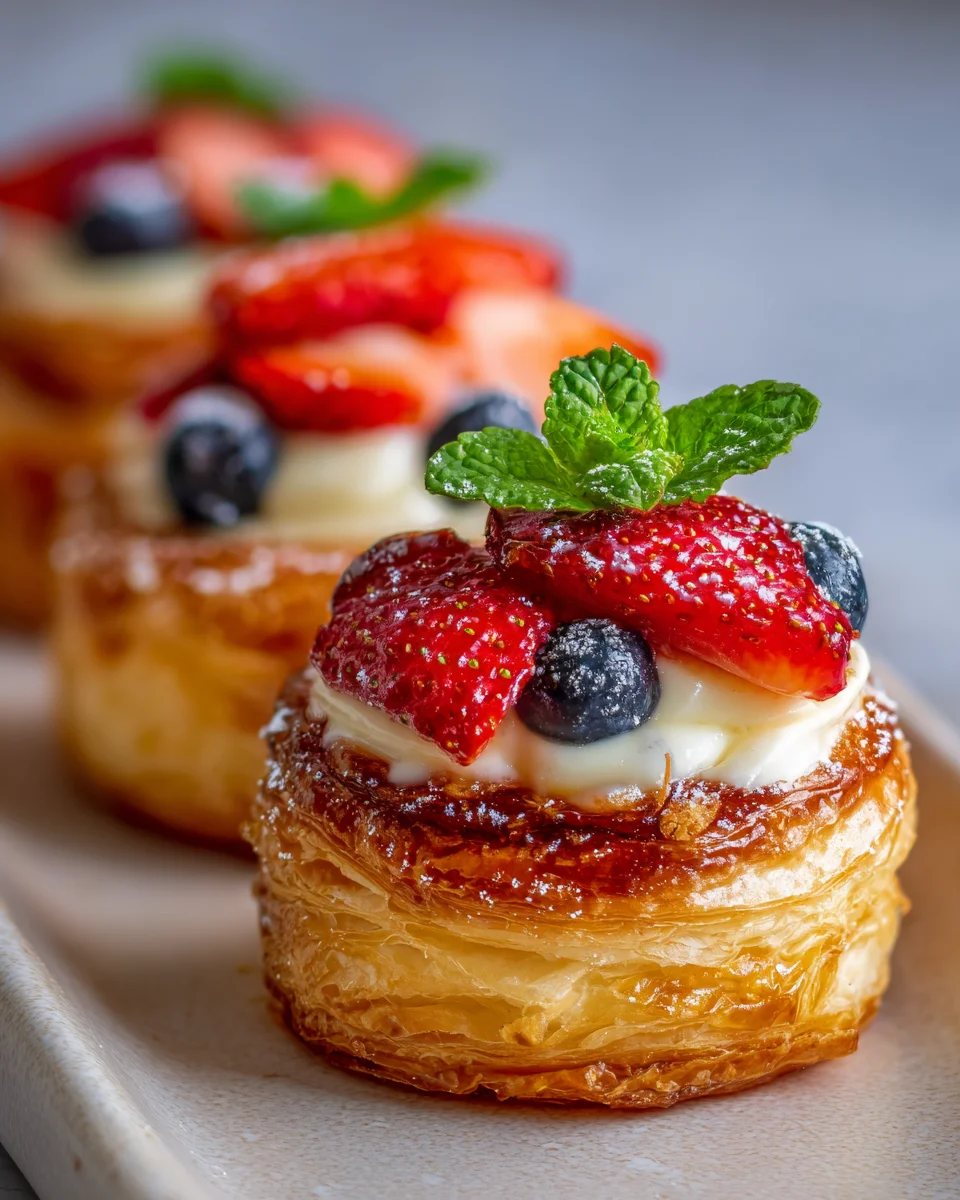
As the pan heats up in the oven, something truly magical happens underneath that golden dough. The sugars and fats trapped beneath the heavy pastry layer begin to boil and concentrate, effectively candy-coating the fruit or vegetables in their own juices. Meanwhile, the exposed dough on top is free to rise to its absolute maximum potential, creating hundreds of incredibly light, buttery layers. Once the baking process is complete and you flip the pastry over, the bottom becomes a glossy, shimmering crown of caramelized goodness while the pastry serves as a sturdy, flaky foundation. It is an ingenious technique that guarantees a crisp crust every single time, completely eliminating the dreaded soggy bottom that plagues so many traditional baked goods.
Origin of This Recipe
To fully appreciate the genius behind upside-down puff pastry tarts, we have to travel back in time to late nineteenth-century France. The ancestral grandmother of this modern viral sensation is the world-famous Tarte Tatin. According to culinary lore, this iconic dessert was created completely by accident at the Hotel Tatin in Lamotte-Beuvron, which was run by two sisters named Stephanie and Caroline Tatin. One exceptionally busy afternoon, Stephanie was attempting to make a traditional apple pie but accidentally left the apples cooking in butter and sugar for far too long. Smelling the burning sugar, she desperately tried to save the dessert by slapping a sheet of pastry dough directly over the top of the pan and shoving the whole thing into the oven.
When she flipped the finished creation onto a serving platter, the hotel guests were completely mesmerized by the deep caramelization and extraordinary texture, and a culinary legend was officially born. For over a century, making a Tarte Tatin was considered a true test of a baker’s skill, requiring precise control over a heavy cast-iron skillet. However, in the modern digital era, creative home cooks realized they could scale this exact concept down into individual portions using sheets of pre-made store-bought dough and a standard flat baking sheet. This brilliant adaptation democratized the classic French dessert, giving rise to the contemporary upside-down puff pastry tarts that continue to captivate food lovers across the globe today.
Ingredients and Exact Quantities
One of the most appealing aspects of this recipe is how incredibly concise the ingredient list is. By relying on high-quality components, you allow the natural flavors of the food to take center stage. Here is exactly what you need to gather on your kitchen counter to prepare these magnificent pastries:
The Universal Pastry Base
-
One sheet of high-quality puff pastry, which must be thoroughly thawed but still cold to the touch
-
One large egg, whisked vigorously with a splash of water to create a glossy egg wash
The Sweet Variations
If you are in the mood for a sweet, dessert-style pastry, choose one of these fruit options and pair it with the corresponding sweetening elements:
-
Two whole apples, cored and cut into beautiful thin slices, or
-
One full cup of fresh mixed berries, or
-
One half cup of juicy pineapple chunks
-
Two to three tablespoons of rich brown sugar or raw honey
-
One tablespoon of unsalted butter, cut into tiny dots
-
A generous sprinkle of ground cinnamon, which is optional but highly recommended for apples
The Savory Variations
If you prefer to take a sophisticated, appetizers-style route, skip the sugars and utilize these savory alternatives instead:
-
A handful of ripe cherry tomatoes cut in half, or a portion of slowly caramelized onions
-
A drizzle of premium extra-virgin olive oil
-
Fine sea salt and freshly cracked black pepper adjusted to your personal taste
-
A few ounces of creamy cheese, such as soft goat cheese or fresh mozzarella
Step by Step Direction and Preparation Method: Upside-down puff pastry tarts
The process of constructing these pastries is remarkably swift, but paying close attention to temperature and placement will elevate your results from ordinary to absolutely spectacular. Follow these detailed steps to ensure your baking session is a resounding success.
Preparing the Caramelization Base
The journey to a flawless pastry begins with setting up your baking surface correctly. Start by preheating your oven to a hot four hundred degrees Fahrenheit. While the oven is rising to temperature, take a large, flat baking tray and line it meticulously with a sheet of high-quality parchment paper. This step is non-negotiable, as the caramel will stick directly to the bare metal pan and ruin your hard work without it.
If you are making the sweet version, decide where your individual tarts will live on the tray. In those specific spots, sprinkle a small, even mound of brown sugar or a neat drizzle of honey. Place a tiny dot of your unsalted butter directly on top of the sugar. This concentrated pocket of sugar and fat is what will melt into a bubbling caramel sauce during the baking process, coating your fruit in a glorious, glossy glaze.
Arranging the Fruit and Toppings
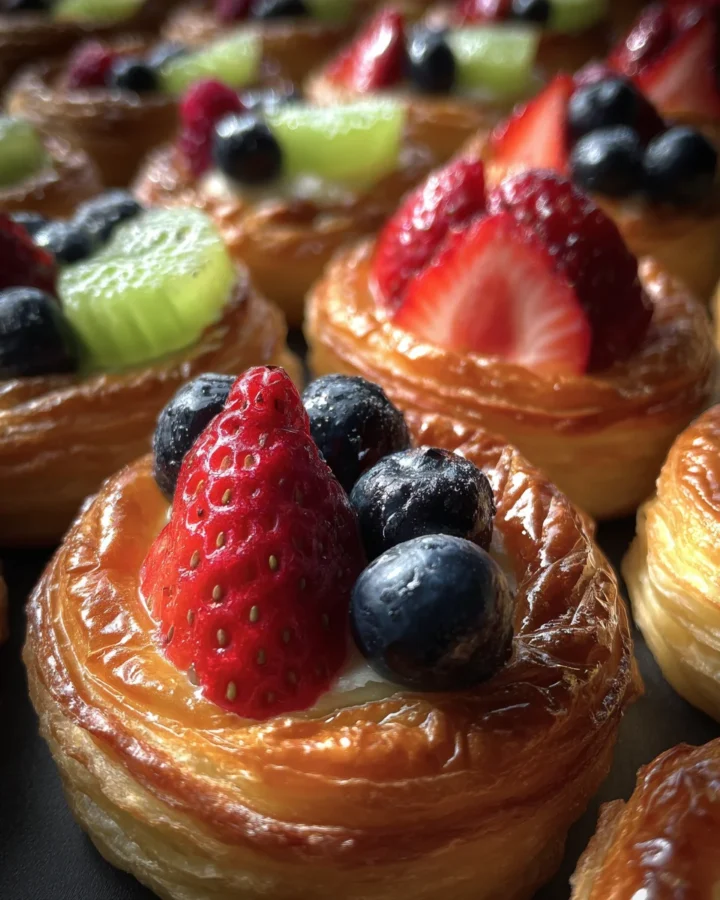
Once your sweet or savory foundations are laid out on the parchment paper, it is time to build the flavor profile. If you are pursuing the sweet apple variation, arrange your thin apple slices in a beautiful, overlapping shingle pattern directly over the brown sugar and butter mounds. If you are using mixed berries or pineapple, pile them neatly within the designated spots, keeping the arrangements relatively compact. Feel free to dust a light coating of ground cinnamon over the fruit at this stage to add a wonderful warmth.
If you have chosen to create the savory variation instead, lay down your halved cherry tomatoes with the cut side facing directly down onto the parchment paper, or spread a neat layer of caramelized onions. Drizzle a tiny amount of extra-virgin olive oil over the vegetables, season them with fine sea salt and black pepper, and crumble your goat cheese or place your mozzarella directly over the top of the vegetable layer.
Cutting and Fitting the Pastry Blanket
Gently unroll your thawed, cold sheet of puff pastry onto a lightly floured work surface. Using a sharp knife or a rolling pizza cutter, divide the dough into squares or circles that are cut slightly larger than the piles of toppings you have arranged on your baking sheet.
Carefully lift each piece of dough and place it directly over a pile of fruit or savory toppings. Use your fingers to gently press the edges of the pastry downward toward the parchment paper, effectively tucking the toppings underneath the dough. This creates a secure little dome that traps the steam and juices inside, forcing the fruit to cook rapidly while preventing the precious juices from spreading too far across the baking sheet.
The Baking and Glazing Stage
To ensure your pastry develops that gorgeous, deep mahogany color that characterizes professional baked goods, take your whisked egg wash and a pastry brush. Lightly paint the entire top surface of each pastry square with the egg wash, being careful not to let it pool excessively around the base.
Slide the baking tray directly onto the center rack of your preheated oven. Let the tarts bake undisturbed for eighteen to twenty-five minutes. Keep a close eye on them through the oven window; you are looking for the dough to puff up dramatically into hundreds of visible layers and turn a deep, uniform golden brown. The aroma of melting butter and cooking fruit filling your kitchen will be absolutely intoxicating.
The Flip and Reveal Presentation
Once the pastries have achieved the perfect color, carefully remove the tray from the oven and place it on a heat-safe counter. It can be incredibly tempting to try and flip them immediately, but you must let them rest undisturbed for exactly five minutes. This brief cooling period allows the bubbling hot caramel or melted cheese to settle and thicken slightly, ensuring it stays attached to the tart rather than running off everywhere.
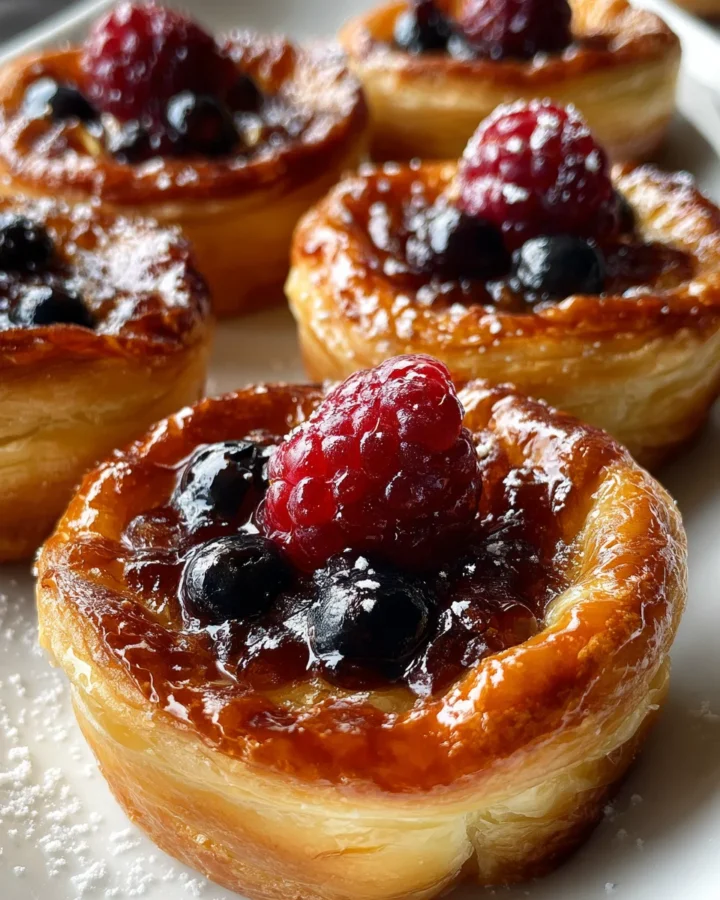
After five minutes have passed, grab a wide, flat spatula. Slide the spatula completely underneath one of the pastry squares, lift it gently, and with one quick, confident motion, flip it upside down onto your serving platter or a clean piece of parchment paper. As you pull the spatula away, you will reveal a breathtaking, glossy crown of perfectly cooked, shimmering fruit or melted cheese sitting proudly atop a mountain of flaky dough. Repeat this process for the remaining tarts and serve them while they are still wonderfully warm.
Variations to Try: Upside-down puff pastry tarts
The fundamental technique behind upside-down puff pastry tarts is incredibly forgiving, making it a spectacular canvas for your own culinary creativity. Once you master the basic steps, you can experiment with an endless array of flavor profiles.
Sophisticated Savory Explorations
While fruit variations are incredibly popular for dessert, the savory applications of this technique are truly mind-blowing. Try placing a thin slice of rich Brie cheese on the parchment paper, topping it with a spoonful of fig jam and a sprinkle of fresh rosemary, and covering it with the pastry. Another spectacular option involves utilizing thinly sliced zucchini and yellow squash layered with a touch of garlic herb butter and grated parmesan cheese. These savory variations make an unforgettable addition to a charcuterie board or an elegant holiday appetizer spread.
Decadent Dessert Upgrades
If you want to take the sweet version to an even more luxurious level, consider incorporating stone fruits when they are in season. Thinly sliced peaches, plums, and apricots work magnificently with the brown sugar caramelization process. You can also sprinkle a handful of finely chopped pecans, walnuts, or sliced almonds directly onto the butter and sugar layer before adding the fruit. As the tart bakes, the nuts will become deeply toasted and embedded into the sticky caramel glaze, adding a spectacular textural contrast.
Tips for Upside-down puff pastry tarts
To ensure your upside-down puff pastry tarts turn out flawless every single time you make them, keep these crucial baking principles in mind:
-
Respect the pastry temperature: Puff pastry relies on tiny layers of cold butter trapped between layers of dough to rise. If the dough gets too warm and soft while you are working with it, the butter will melt prematurely, and your tarts will turn out flat and greasy rather than light and flaky. If the dough feels sticky, pop it into the freezer for five minutes before cutting.
-
Control the moisture levels: It can be incredibly tempting to pile a massive mountain of fruit onto your baking sheet, but restraint is key here. Fruits release a tremendous amount of liquid as they cook. If you overload the tart, the excess juice will overwhelm the caramel and leak out everywhere, resulting in a messy pan and a potentially soggy crust.
-
Enhance the presentation post-bake: Do not hesitate to add a fresh finishing touch right after you flip the tarts. A delicate drizzle of raw honey, a whisper of aged balsamic glaze over the savory versions, or a gentle dusting of powdered sugar can instantly elevate the visual appeal to a professional level.
Serving Ideas: Upside-down puff pastry tarts
The presentation of these individual tarts is naturally dramatic, making them an absolute joy to serve to guests. If you are serving the sweet version as a conclusion to a wonderful dinner party, place each warm tart in the center of a shallow bowl and top it with a generous scoop of premium vanilla bean ice cream or a dollop of freshly whipped heavy cream. The contrast of the freezing cold ice cream melting into the warm, sticky caramel fruit is an absolute paradise for the senses.
For a sophisticated morning brunch, serve the savory tomato or onion variations alongside a crisp green salad tossed in a light lemon vinaigrette. The bright acidity of the salad cuts through the rich, buttery pastry beautifully. Pair the entire experience with a steaming pot of artisanal coffee or a fragrant Earl Grey tea, and you have a breakfast experience that feels like an absolute celebration.
FAQs: Upside-down puff pastry tarts
Can I use store-bought pie crust instead of puff pastry?
While you can technically use standard pie dough for this method, the final result will be significantly different. Standard pie crust is designed to be short and crumbly rather than light and airy. It will still taste delicious with the caramelized fruit, but you will miss out on those spectacular, dramatic puffy layers that make upside-down puff pastry tarts so uniquely satisfying. For the intended texture, stick firmly to puff pastry.
Can these tarts be made ahead of time and reheated?
These pastries are undoubtedly at their absolute peak of flavor and texture within the first hour of being baked, as that is when the crust is at its crispest. However, if you have leftovers, you can absolutely save them. Store them in a single layer inside an airtight container in the refrigerator for up to two days. When you are ready to enjoy them again, avoid the microwave, as it will make the dough incredibly soggy. Instead, place them back onto a baking sheet and warm them in a four hundred degree oven for about five to seven minutes to restore that signature crunch.
Why did my caramel turn out bitter or dark?
If your caramel tastes bitter, it means the sugar cooked a bit too quickly or the oven ran slightly hotter than indicated. Every oven has its own unique personality, so if you notice the edges of the sugar turning dark brown too quickly during your first baking session, simply reduce the oven temperature by twenty-five degrees for your next batch or move the baking tray to a higher rack away from the bottom heating element.
Conclusion: Upside-down puff pastry tarts
Bringing the elegance of a classic European bakery into your home kitchen does not require a lifetime of training or a stressful afternoon of complicated steps. By embracing the playful, innovative technique behind upside-down puff pastry tarts, you transform basic pantry staples into a visual and culinary triumph. It is a recipe that rewards curiosity and rewards you with a spectacular contrast of buttery crunch and sweet or savory depth. Bake a batch for your next gathering or treat yourself on a quiet Sunday afternoon, and savor the absolute joy of a dessert that is perfectly crisp from the very first bite to the last.
Print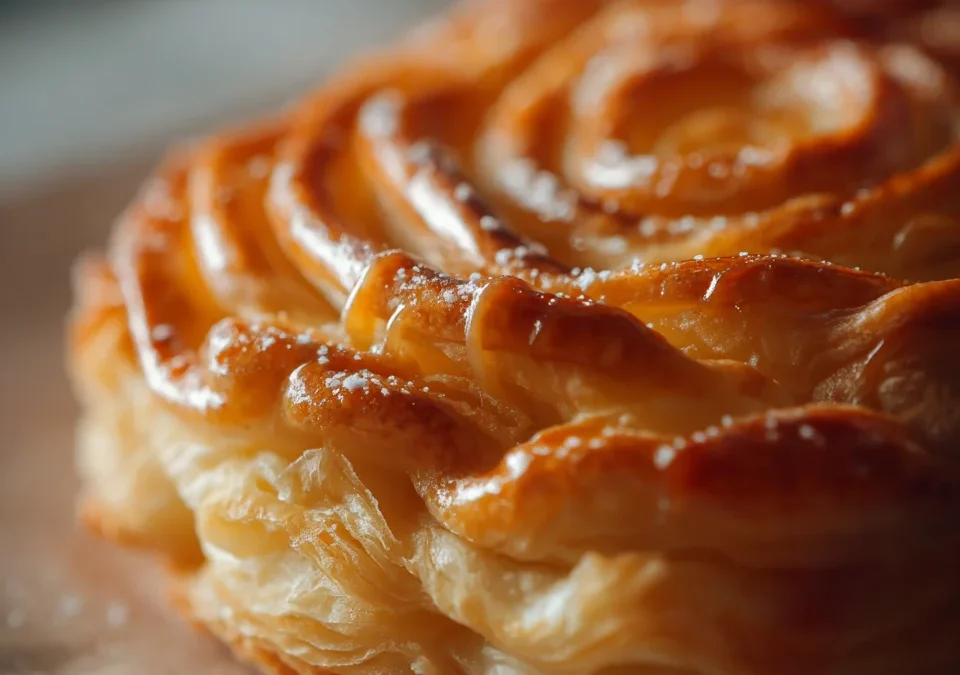
Upside-Down Puff Pastry Tarts
- Total Time: 40 minutes
- Yield: 6 tarts 1x
- Diet: Vegetarian
Description
At its absolute core, this dish is a brilliant exercise in rustic French-style baking, heavily inspired by classical methodology but streamlined for the modern home cook. Instead of building a pastry inside a traditional pie dish or tart pan where the crust sits on the bottom and the toppings sit on top, this method completely reverses the spatial dynamics. You arrange your sweet or savory toppings directly onto a lined baking sheet first, and then drape a sheet of pre-cut pastry over the top like a cozy blanket.
Ingredients
Base
- 1 sheet puff pastry (thawed)
- 1 egg (for egg wash)
Sweet version (choose one)
- 2 apples, sliced OR
- 1 cup mixed berries OR
- 1/2 cup pineapple chunks
- 2–3 tbsp brown sugar or honey
- 1 tbsp butter
- Cinnamon (optional)
Savory version (optional alternative)
- Cherry tomatoes or caramelized onions
- Olive oil
- Salt & pepper
- Cheese (goat cheese or mozzarella)
Instructions
1. Prepare the topping base
- Preheat oven to 400°F (200°C).
- Line a baking tray with parchment paper.
- Lightly grease small circles (or muffin tin bottoms if using molds).
- Sprinkle brown sugar and a small dot of butter on each spot.
2. Add fruit or toppings
- Arrange fruit slices or savory toppings directly on the sugar layer.
- Sprinkle cinnamon for sweet versions if desired.
3. Add puff pastry
- Cut puff pastry into squares or circles slightly larger than toppings.
- Place pastry over the fruit and tuck edges underneath.
4. Bake
- Brush pastry with egg wash.
- Bake for 18–25 minutes until puffed and golden brown.
5. Flip & serve
- Let rest for 5 minutes.
- Carefully flip each tart upside down to reveal caramelized topping.
Notes
- Prep Time: 15 minutes
- Cook Time: 25 minutes
- Category: Dessert
- Method: Baking
- Cuisine: French
Nutrition
- Serving Size: 1 tart
- Calories: 290 kcal
Keywords: Viral pastry tarts, flipped puff pastry, caramelized fruit tarts, easy puff pastry recipe