There is something undeniably luxurious about slicing into a chilled, velvety dessert that requires absolutely no time in a hot kitchen oven. If you are searching for a dessert that pairs elegant flair with effortless preparation, mastering this Creamy Pistachio Dream No-Bake Cheesecake recipe is the perfect way to impress your friends and family. This particular treat brings together the earthy, rich notes of real nuts with a fluffy, cloud-like cheese base, all resting on top of a beautifully sweet and classic graham cracker foundation.
Baking from scratch can be rewarding, but during warm weather or busy holiday seasons, a refrigerator-set alternative is an absolute lifesaver. Preparing this Creamy Pistachio Dream No-Bake Cheesecake requires no complicated water baths, zero worrying about surface cracks, and no delicate timing adjustments. Whether you are throwing an upscale dinner gathering or simply want a sweet treat to enjoy after dinner, this complete guide will walk you through the history, ingredients, and expert techniques needed to build a pristine centerpiece dessert.
What Is This Silk and Airy Icebox Creation?
To put it simple, this dish is a modern variation of a classic icebox cake, designed to deliver maximum creaminess without using heat to set the filling. Unlike traditional baked cheesecakes that use eggs and slow oven cooking to firm up the structure, this recipe relies on a combination of stable cream fat and starch to create a sliceable texture that melts on your tongue.
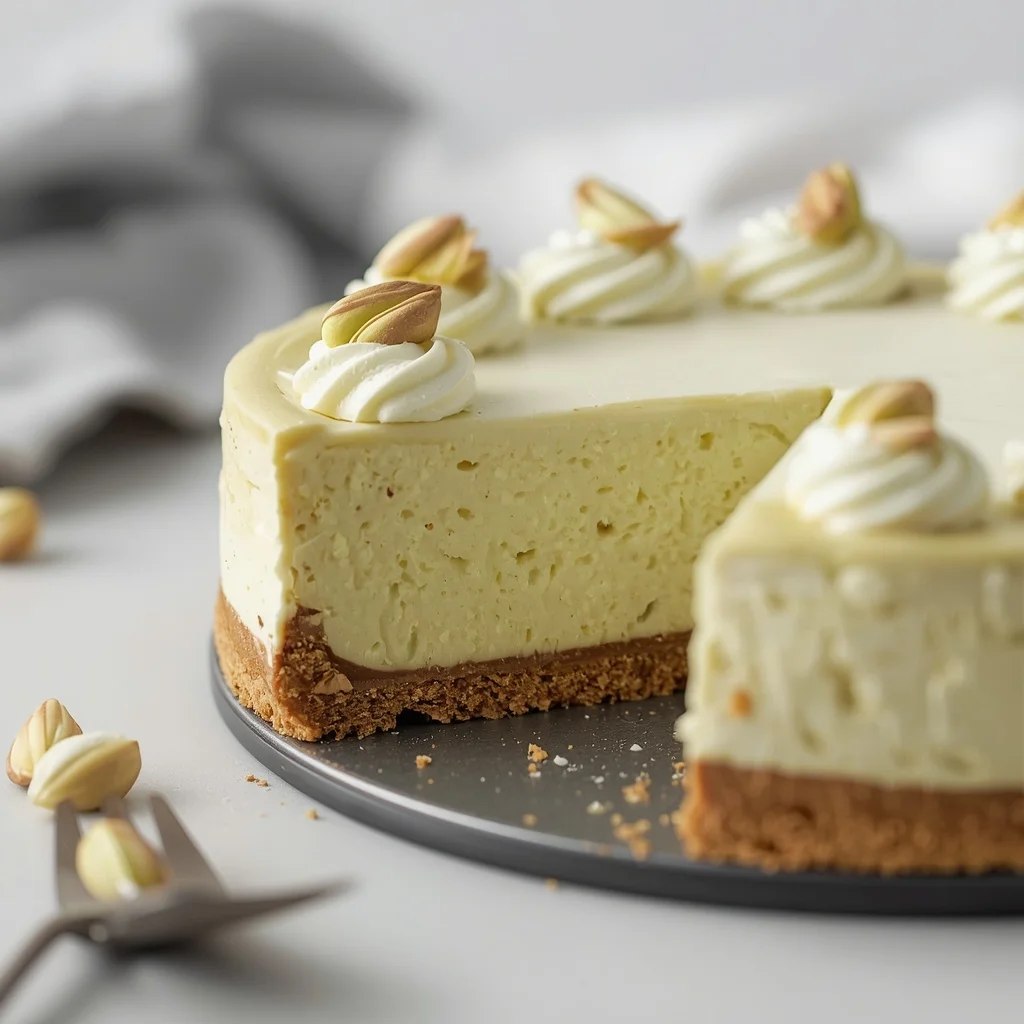
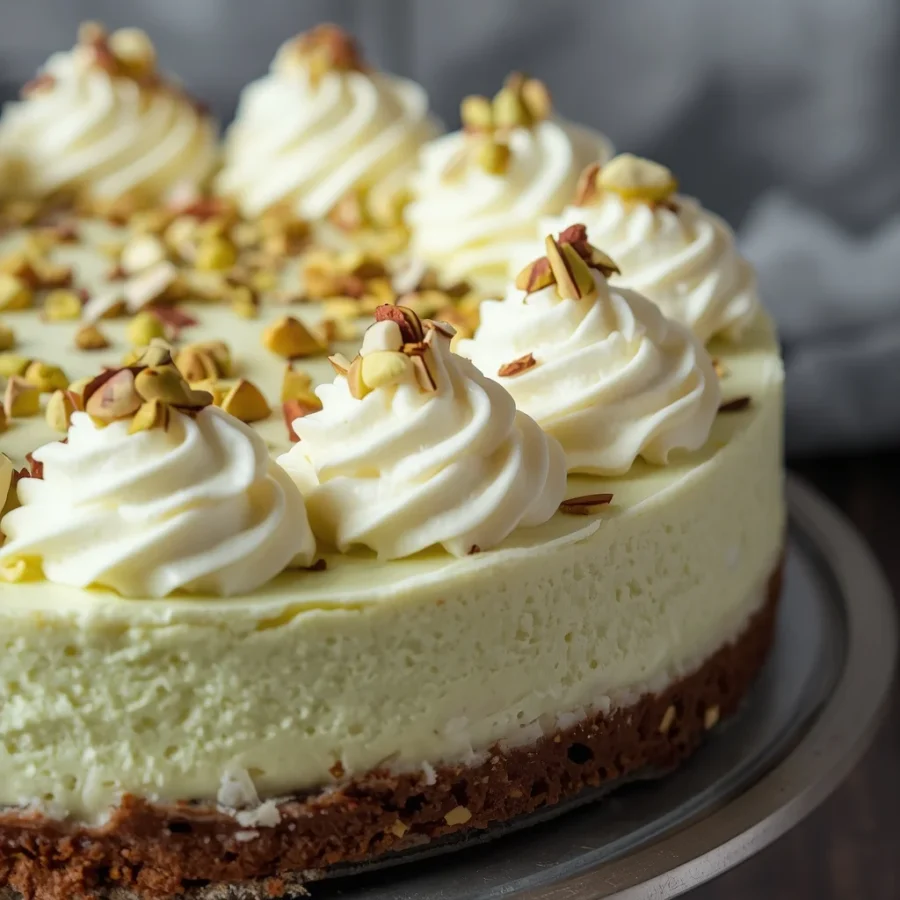
The heart of this dessert is its striking green filling, which achieves an ideal balance of sweet vanilla notes and nutty undertones. Folded into the smooth base are fine bits of actual nuts, introducing a subtle element of crunch that contrasts beautifully with the silk body. The crust serves as a sturdy, buttery container that adds an essential hint of salt, ensuring that the dessert tastes wonderfully balanced from the very first bite to the very last.
The Textural Magic of No-Bake Fillings
The lack of heat means that the proteins in the dairy do not tighten up or firm up like they do in a standard baked custard. Instead, the fluffy texture is achieved by trapping millions of tiny air bubbles inside heavy whipping cream before folding it gently into the denser base components.
This creates an airy structure that feels remarkably light on the palate, almost resembling a gourmet mousse. By choosing a cold setting process, you preserve the bright, delicate flavor notes of the vanilla and nuts, which can sometimes become muted when subjected to prolonged high temperatures in an oven.
The Historical Origin of Icebox Cakes and Cold Setting
To appreciate how this cold dessert became a favorite among modern home cooks, we must look at the history of food preservation and convenience cooking. Before mechanical refrigeration became common in households, chilled desserts were a luxury reserved only for the wealthy who had access to dedicated ice houses. The true ancestor of the modern no-bake dessert is the traditional European charlotte, which lined molds with sponge cake or ladyfingers and filled them with chilled custards or flavored creams.
The Rise of the American No-Bake Phenomenon
During the early twentieth century, the widespread introduction of domestic iceboxes and electric refrigerators completely transformed how home cooks approached meal preparation. Food manufacturing companies quickly recognized this shift and began printing recipes on the backs of packaging to teach homemakers how to use their new appliances.
By the mid-twentieth century, instant puddings and pre-crushed biscuit crumbs made it possible to assemble elegant, cool desserts in a fraction of the time. This specific green variation evolved as a creative spin on those early refrigerator desserts, celebrating the unique flavor profile of stone fruit kernels and nuts that became highly popular in mid-century American baking culture.
Essential Ingredients and Detailed Quantities: Pistachio Dream No-Bake Cheesecake
Achieving professional boutique results requires using the right dairy foundations and keeping your proportions accurate. Here is everything you need to gather before starting assembly.
The Perfect Buttery Foundation
-
One and one-half cups of fine graham cracker crumbs, ensuring the pieces are broken down completely into a sand-like texture.
-
One-third cup of white granulated sugar to help sweeten the base and bind the crumbs together.
-
Six tablespoons of unsalted butter, completely melted and cooled slightly so it does not dissolve the sugar.
-
A small pinch of fine table salt to balance the sweetness of the biscuit base.
The Luxurious Green Pistachio Filling
-
Sixteen ounces of traditional cream cheese, completely softened to room temperature so it blends into a smooth mixture without lumps.
-
One cup of powdered sugar, sifted through a fine strainer to remove any small clusters.
-
One teaspoon of pure vanilla extract to add a classic, aromatic depth to the dairy base.
-
One standard three-point-four-ounce package of instant pistachio pudding mix, which provides the distinctive flavor, color, and structural stability.
-
One cup of cold whole milk, kept chilled until the exact moment of mixing to ensure the starches activate properly.
-
One cup of heavy whipping cream, boasting a high fat content to ensure it whips up into stable, stiff peaks.
-
One-half cup of finely chopped pistachios, preferably unsalted, to provide a natural crunch and authentic nut flavor throughout the interior.
-
One-half teaspoon of pure almond extract, which is entirely optional but highly recommended to enhance the sweet, stone-fruit aroma of the nuts.
The Elegant Finishing Garnishes
-
One cup of fresh whipped cream, sweetened lightly, to create decorative swirls on the surface.
-
Two to three tablespoons of chopped pistachios, kept raw or lightly toasted for a vibrant green color accent.
-
A handful of white chocolate shavings, optional, to add a visually stunning contrast and a creamy sweetness.
-
A light dusting of leftover graham cracker crumbs to tie the visual presentation to the underlying foundation.
Step by Step Direction and Detailed Preparation Method: Pistachio Dream No-Bake Cheesecake

With your tools and ingredients organized on your counter, it is time to assemble this magnificent Creamy Pistachio Dream No-Bake Cheesecake. Follow these clear steps to achieve a flawless presentation.
Pressing the Perfect Foundation
Begin by taking a medium-sized mixing bowl and combining your one and one-half cups of fine graham cracker crumbs, one-third cup of granulated sugar, and a small pinch of fine table salt. Whisk the dry elements together until they are completely integrated. Pour the six tablespoons of melted unsalted butter directly over the crumbs.
Grab a fork and stir the mixture thoroughly until every single crumb is coated in the liquid fat, resulting in a texture that looks and feels exactly like damp beach sand. Pour this mixture into the bottom of a standard nine-inch springform pan.
Using the flat bottom of a glass or a measuring cup, press the crumbs down firmly and evenly across the base of the pan, making sure to compact the edges so the crust does not crumble apart when sliced later. Place the pan directly into your refrigerator to chill and firm up while you focus on creating the main filling.
Creaming the Cheese Base
In a large mixing bowl, place your sixteen ounces of completely softened cream cheese. Using a sturdy hand mixer or a stand mixer fitted with the paddle attachment, beat the cheese on medium speed for two to three minutes until it looks completely smooth, shiny, and free of any stubborn blocks.
Stop the mixer and add the one cup of sifted powdered sugar and one teaspoon of pure vanilla extract. Turn the mixer back on low speed to prevent the sugar from flying out of the bowl, then increase to medium speed, beating until the sugar is fully integrated and the mixture has transformed into a rich, uniform cream.
Activating the Starch and Folding
In a separate medium-sized bowl, pour in your one cup of cold whole milk and add the package of instant pistachio pudding mix. Whisk these two components together vigorously by hand for roughly two full minutes. As you whisk, you will notice the liquid quickly changing color to a soft pastel green and thickening into a light custard consistency.
Once the pudding has set slightly, pour it directly into your large bowl of cream cheese mixture. Use a large silicone spatula to fold the two bases together, moving in a circular motion until the color is completely uniform and no white streaks remain. Stir in the one-half cup of finely chopped pistachios and the optional one-half teaspoon of almond extract.
Creating Stable Structural Peaks
In a third clean bowl, pour your one cup of cold heavy whipping cream. Using clean beaters, whip the cream on high speed until it expands in volume and forms stable, stiff peaks that hold their shape when the beaters are lifted straight up.
Take a third of this freshly whipped cream and fold it into your green base to lighten up the texture. Once integrated, add the remaining whipped cream and fold with an incredibly light hand. It is crucial to work gently during this step so you do not deflate the trapped air bubbles, which are essential for keeping the dessert light and airy.
Assembly and the Essential Cold Cure
Retrieve your chilled springform pan from the refrigerator. Pour the fluffy green filling directly over the crust, using your spatula to guide it into every corner. Use an offset spatula or the back of a large spoon to smooth the surface into a completely flat, seamless layer.
Cover the top of the pan tightly with plastic wrap or aluminum foil to protect the delicate dairy from absorbing any stray odors from your refrigerator. Place the dessert into the refrigerator for a minimum of six full hours, though leaving it overnight is highly recommended to guarantee the cleanest slices and a firm texture.
Final Presentation and Serving Elegance
Once the setting time is complete, remove the pan from the refrigerator. Run a thin kitchen knife carefully around the inside edge of the ring to loosen the dairy from the metal wall, then slowly unlatch and lift the springform ring away.
Transfer the dessert onto a serving platter. Pipe or spread your one cup of extra whipped cream over the top, then decorate the surface with a generous scattering of chopped pistachios, white chocolate shavings, and a light dusting of biscuit crumbs. Slice with a warm, clean knife, wiping the blade between each cut to ensure an immaculate presentation.
Creative Flavor Variations: Pistachio Dream No-Bake Cheesecake
Once you are comfortable with the core technique of this recipe, you can adapt the flavor profile to match specific holiday themes or play with different ingredient combinations.
The Decadent Chocolate Mint Spin
For a rich, dark contrast that feels incredibly festive, try swapping out the traditional graham cracker crust for an equal quantity of crushed chocolate cream cookies. The combination of a dark cocoa base and a pastel green filling creates a stunning visual contrast. You can even stir a handful of mini semi-sweet chocolate chips directly into the filling before chilling, resulting in a flavor dynamic that mirrors a high-end mint chocolate chip ice cream.
The Ultimate Toasted Coconut Tropical Fusion
If you love a nutty flavor profile with a hint of tropical sweetness, you can introduce coconut into the mix. Replace two tablespoons of the butter in the crust with melted virgin coconut oil, and fold one-quarter cup of toasted, unsweetened shredded coconut directly into the filling alongside the chopped nuts. The natural sweetness of the coconut accentuates the earthy qualities of the nuts, creating a deeply fragrant, complex dessert that feels perfect for outdoor summer gatherings.
The Sophisticated Tart Berry Layer
To cut through the rich density of the cream cheese and pudding base, you can introduce a vibrant fruit element. Before pouring the green filling over the crust, spread a thin, even layer of high-quality raspberry or blackberry compote directly across the bottom of the biscuit base. The sharp, tart acidity of the dark berries creates a beautiful flavor counterpoint to the sweet, buttery characteristics of the pistachio filling, making each bite incredibly complex and satisfying.
Pro Tips for Clean Slices and Flawless Presentation: Pistachio Dream No-Bake Cheesecake
Serving a cold-set dessert on a beautiful platter requires maintaining its delicate structure and clean lines.
Mastering the Warm Knife Method
The high fat content of cream cheese means that it can stick to a cold knife blade, resulting in jagged edges and messy lines when you try to portion out the dessert. To solve this, fill a tall glass with hot water from your tap and dip your long chef’s knife into it for ten seconds before making your first cut.
The metal blade will absorb the heat, allowing it to slide through the chilled cream like butter. Dry the blade completely on a clean kitchen towel, make one clean slice straight down, and wipe the knife clean before dipping it back into the hot water for the next slice.
Managing Temperature for Maximum Stability
It can be tempting to rush the chilling process by placing the assembled dessert into your kitchen freezer, but doing so can alter the final texture. Freezing can cause the water molecules in the milk and cream to form large ice crystals, which can release excess liquid when the dessert thaws, resulting in a soggy crust. Stick to the refrigerator for the primary setting stage, and only utilize a brief twenty-minute window in the freezer immediately before slicing if you prefer a firmer, extra-clean cut.
Frequently Asked Questions: Pistachio Dream No-Bake Cheesecake
Why did my Pistachio Dream No-Bake Cheesecake turn out too soft or runny?
A runny filling is usually caused by using warm ingredients, warm milk, or under-whipping the heavy cream. The instant pudding mix requires cold liquid to activate its thickening starches properly, so using warm milk can prevent it from setting. Additionally, if your heavy cream was only whipped to soft peaks rather than stiff peaks, it will lack the structural integrity needed to hold up the heavy cream cheese. Ensure your dairy components are completely chilled before you begin, and make sure your cream cheese is softened just enough to blend, not melted.
Can I use a regular pie dish instead of a springform pan?
Yes, if you do not own a nine-inch springform pan, you can easily assemble this dessert inside a standard deep-dish pie plate or an eight-by-eight square baking dish. The only difference is that you will not be able to remove the outer ring to show off the clean sides of the layers. Instead, you will simply scoop or slice the portions directly out of the dish, which delivers a more rustic, home-style appearance that tastes every bit as spectacular as the molded version.
How long can I store Pistachio Dream No-Bake Cheesecake in the refrigerator?
You can keep this treat covered securely in your refrigerator for up to five full days. To maintain the best possible quality, hold off on adding the fresh whipped cream decoration and the extra chopped nuts until the actual day you plan to serve the dessert. Leftover nuts stored on top of wet cream can lose their crisp texture over time, turning soft and losing that satisfying, fresh crunch.
Can I use cook-and-serve pudding mix instead of instant?
No, it is absolutely essential that you use instant pudding mix for this specific preparation method. Cook-and-serve pudding formulas require heat to activate their starches and thicken the liquid, meaning they will not set up when whisked into cold milk. Trying to use a cook-and-serve alternative would leave you with a thin, liquid filling that will not firm up, completely ruining the structural integrity of your no-bake dessert.
Conclusion: Pistachio Dream No-Bake Cheesecake
Creating a luxurious, high-end dessert from scratch does not require spending hours monitoring a hot oven when you understand the principles of cold setting and dairy structure. This Creamy Pistachio Dream No-Bake Cheesecake demonstrates how basic, accessible ingredients can be combined to build a silky, crowd-pleasing centerpiece through careful folding and proper chilling techniques. By mastering the art of whipping stable cream peaks, allowing ample time for the starch to activate in the cold refrigerator, and using the warm knife method for serving, you can deliver a magnificent dessert experience that feels light, refreshing, and entirely professional. So gather your cold ingredients, press your buttery biscuit foundation, and enjoy the effortless satisfaction of creating this ultimate cool treat today.
Print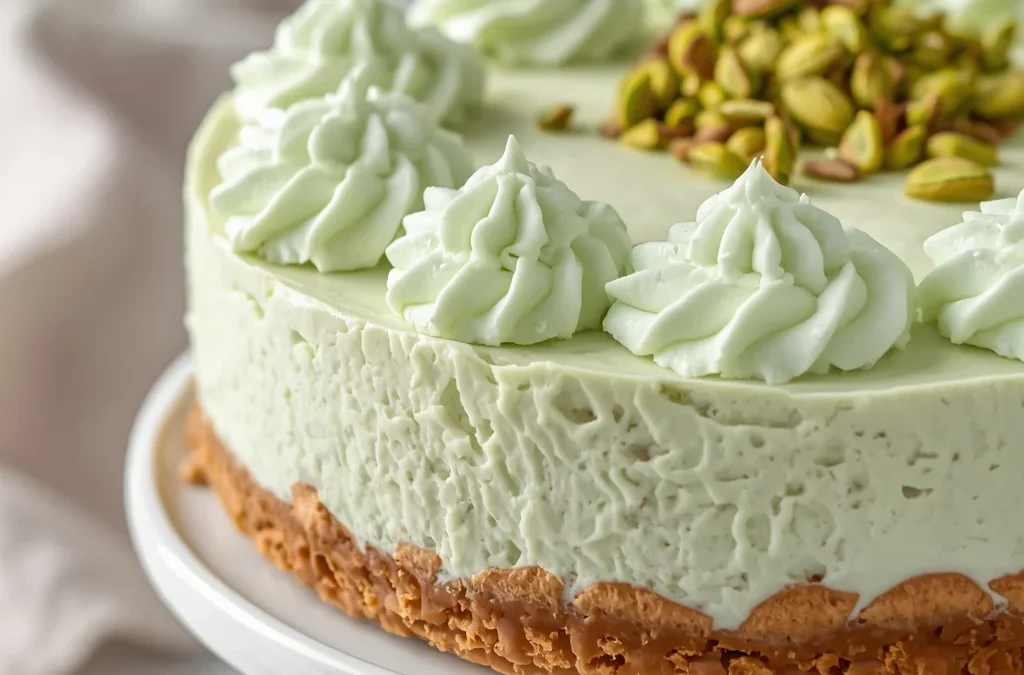
Creamy Pistachio Dream No-Bake Cheesecake Recipe
- Total Time: 6 hours 20 minutes (including chilling time)
- Yield: 8 servings 1x
- Diet: Vegetarian
Description
To put it simple, this dish is a modern variation of a classic icebox cake, designed to deliver maximum creaminess without using heat to set the filling. Unlike traditional baked cheesecakes that use eggs and slow oven cooking to firm up the structure, this recipe relies on a combination of stable cream fat and starch to create a sliceable texture that melts on your tongue.
Ingredients
For the Crust
- 1½ cups graham cracker crumbs
- ⅓ cup granulated sugar
- 6 tablespoons unsalted butter, melted
- Pinch of salt
For the Pistachio Cheesecake Filling
- 16 oz (450 g) cream cheese, softened
- 1 cup powdered sugar
- 1 teaspoon vanilla extract
- 1 (3.4 oz) package instant pistachio pudding mix
- 1 cup cold milk
- 1 cup heavy whipping cream
- ½ cup finely chopped pistachios
- ½ teaspoon almond extract (optional)
For the Topping
- 1 cup whipped cream
- 2–3 tablespoons chopped pistachios
- White chocolate shavings (optional)
- Crushed graham crackers for garnish (optional)
Instructions
1. Prepare the Crust
- In a medium bowl, combine the graham cracker crumbs, sugar, melted butter, and salt.
- Mix until the crumbs resemble wet sand.
- Press firmly into the bottom of a 9-inch springform pan.
- Refrigerate while preparing the filling.
2. Make the Filling
- In a large bowl, beat the softened cream cheese until smooth.
- Add the powdered sugar and vanilla extract, mixing until creamy.
- In a separate bowl, whisk together the pistachio pudding mix and cold milk for about 2 minutes until slightly thickened.
- Fold the pudding mixture into the cream cheese mixture.
- Add the chopped pistachios and almond extract, if using.
3. Whip the Cream
- In another bowl, whip the heavy cream until stiff peaks form.
- Gently fold the whipped cream into the pistachio mixture until light and fluffy.
4. Assemble
- Spread the filling evenly over the chilled crust.
- Smooth the top with a spatula.
- Cover and refrigerate for at least 6 hours, preferably overnight.
5. Decorate and Serve
- Remove the cheesecake from the springform pan.
- Top with whipped cream, chopped pistachios, and white chocolate shavings if desired.
- Slice and serve chilled.
Notes
Store the cheesecake covered in the refrigerator for up to 5 days. For longer storage, freeze individual slices for up to 2 months and thaw in the refrigerator before serving.
- Prep Time: 20 minutes
- Cook Time: 0 minutes
- Category: Dessert
- Method: No-Bake
- Cuisine: American
Nutrition
- Serving Size: 1 slice (1/8 of cheesecake)
- Calories: Approximately 480 kcal
Keywords: No-Bake Pistachio Cheesecake, Pistachio Icebox Cheesecake, Easy Green Pistachio Dessert