
There is a magical moment in the kitchen when sweet, savory, and spicy flavors collide to create something completely unforgettable. If you are searching for the perfect crowd pleasing appetizer or a comforting weekend dinner, learning how to assemble hot honey cheddar chicken biscuit bombs will completely transform your meal rotation. This dish takes everything you love about a classic chicken dinner—melted cheese, tender protein, and flaky pastry—and wraps it into a portable, flavor packed package. The contrasting elements of the sweet, fiery glaze on the outside and the warm, gooey filling on the inside create a texture profile that rivals any trendy bakery or restaurant creation.
Mastering hot honey cheddar chicken biscuit bombs does not require professional culinary training or hours of tedious kitchen prep. By utilizing smart shortcuts like high quality refrigerated dough alongside a highly seasoned, homemade filling, you can achieve a spectacular outcome with minimal effort. This recipe is highly adaptable, making it an excellent option for using up leftovers from a previous night’s roast chicken or creating a stunning game day spread that will disappear in seconds. Let us take an in depth look at the history behind this flavor pairing, explore the essential elements that build the structure, and walk through the precise steps needed to bake these golden treasures to absolute perfection.
What Exactly are Biscuit Bombs?
To truly appreciate this modern culinary creation, it helps to understand the anatomy of a stuffed biscuit. Traditional American biscuits are celebrated for their flaky, laminated layers and buttery crumb, usually served split open with a pat of butter, sweet jam, or a ladle of thick sausage gravy. A biscuit bomb flips this concept entirely on its head by turning the pastry into an enclosed, self contained vessel.
By flattening the raw dough, filling the center with a highly concentrated mixture of proteins and fats, and sealing the edges tightly before baking, you essentially create a stuffed pastry globe. As the dough rises and expands in the heat of the oven, the interior filling steam cooks, melting the cheeses and melding the flavors together. The result is an explosive burst of flavor and a wonderfully gooey texture the very second you break the warm pastry apart.
The Rise of the Sweet and Spicy Flavor Profile
The irresistible pairing of poultry with sweet and spicy glazes has a rich history that spans across multiple global food cultures. From the classic chicken and waffles of the American South to the sticky, gochujang infused glazes of Korean fried chicken, humans have long been obsessed with balancing fiery heat with smooth sweetness. The specific craze surrounding hot honey blossomed across modern metropolitan food scenes over the last decade, transitioning from a niche condiment used by artisanal pizza makers into a mainstream culinary phenomenon.
Combining this sweet heat with sharp cheese and rich chicken is a natural evolution of comfort food. Biscuits have been a staple of southern baking since the nineteenth century, prized for their ability to stretch simple ingredients into a filling meal. By infusing these traditional, buttery baked goods with a contemporary, fiery honey glaze and a savory meat stuffing, we bridge the gap between historic baking techniques and modern flavor trends.
Ingredients You Will Need for Hot Honey Chicken Biscuit Bombs
Creating a spectacular tray of hot honey cheddar chicken biscuit bombs relies on a balance of accessible pantry staples and fresh, flavorful components. Each element plays a crucial role in ensuring the final pastry is structural, moist, and perfectly seasoned.
For the Savory Chicken and Cheese Filling
-
Cooked chicken: Two cups. You can use shredded breast meat, chopped thighs, or a pulled rotisserie bird from the grocery store. Ensure it is finely shredded or chopped small so it fits neatly inside the dough pockets.
-
Shredded cheddar cheese: One cup. A sharp or extra sharp variety provides the best flavor contrast against the sweet glaze, melting into a beautiful, gooey mass during the baking process.
-
Plain cream cheese: Two tablespoons. While this ingredient is entirely optional, it is highly recommended. It binds the dry chicken shreds and cheddar together, creating a luxurious, velvety texture that keeps the interior from drying out.
-
Garlic powder: Half a teaspoon. This adds a deeply savory, aromatic base note that complements the poultry beautifully.
-
Smoked paprika: Half a teaspoon. Introduces a gorgeous color and a subtle, backyard woodsmoke undertone to the filling mixture.
-
Fine salt and ground black pepper: Added in small increments to taste, ensuring every layer of the filling is fully seasoned.
Flaky Pastry Structure
-
Refrigerated biscuit dough: One can containing eight individual pieces. Choosing a flaky or buttermilk variety will yield the best textural contrast, though you can absolutely utilize your favorite scratch made buttermilk dough if you have the extra time.
For the Signature Hot Honey Glaze
-
Pure honey: Three tablespoons. This provides the sticky, luxurious base for your exterior glaze, coating the hot crust beautifully.
-
Hot sauce: One to two teaspoons. Choose a vinegar forward or cayenne based hot sauce, adjusting the quantity based on how much heat your family prefers.
-
Unsalted butter: One tablespoon, completely melted. Blending butter into the glaze cuts the intense sweetness of the honey and creates a silky, glossy finish on the baked pastry.
-
Crushed chili flakes: A small pinch. This is entirely optional but adds a lovely visual texture and an extra pop of raw heat to the exterior glaze.
Optional Garnishes for Visual Appeal
-
Extra cheddar cheese: Reserved for sprinkling over the tops during the final minutes of baking.
-
Fresh parsley: Finely chopped to add a bright, herbaceous pop of green contrast just before serving.
Step by Step Direction and Preparation Method: Hot Honey Chicken Biscuit Bombs
Now that your workstation is organized, let us dive into the preparation method. Following these steps closely ensures that your pastries remain completely sealed and bake evenly from the inside out.
Step One: Blending the Interior Filling
Begin by preparing your filling mixture in a medium mixing bowl. Combine your two cups of cooked shredded chicken and your cup of shredded sharp cheddar cheese. If you are opting for maximum creaminess, drop in your two tablespoons of softened cream cheese at this stage.
Sprinkle your garlic powder, smoked paprika, salt, and ground black pepper directly over the top. Using a sturdy spoon or a flexible spatula, stir the mixture vigorously. Press down on the cream cheese to help distribute it evenly among the chicken shreds. Continue mixing until the components form a cohesive, slightly tacky filling that holds its shape when pressed together. Taste a small amount and adjust the salt or pepper if necessary, then set the bowl aside.
Step Two: Processing and Flattening the Pastry
Open your can of refrigerated biscuit dough and separate the eight individual rounds. Place them onto a clean, lightly floured work surface or a sheet of parchment paper to prevent any sticking.
Using the palm of your hand, gently press down on the center of each dough round to begin flattening it. Next, use a small rolling pin or your fingers to gently work the dough outward from the center, transforming each piece into a flat, even circle roughly double its original diameter. You want the edges to be slightly thinner than the center, as this will prevent a dense knot of dough from forming when you seal the bottom of the pastry.
Step Three: Stuffed Geometry and Sealing Technique
Take one of your flattened dough circles and place roughly one to two tablespoons of your chicken and cheese filling directly into the exact center. Be careful not to overfill the dough, as an overstuffed pastry will be incredibly difficult to seal properly.
[ Flatten Dough ] ➔ [ Place Filling in Center ] ➔ [ Gather Edges & Pinch ] ➔ [ Invert Seam Down ]
Carefully gather the opposite outer edges of the dough circle and pull them up over the mountain of filling, meeting in the center. Pinch the dough edges together tightly with your fingertips, working your way around the entire perimeter until the filling is fully enclosed. Roll the stuffed ball gently between your palms to smooth out any rough lines, making sure there are absolutely no visible gaps or tears. A tight, secure seal is paramount to preventing your cheese from completely leaking out onto the pan during the baking process.
Step Four: The Golden Baking Process
Preheat your kitchen oven to three hundred and seventy five degrees Fahrenheit. While the appliance warms up, line a large, sturdy baking tray with a sheet of parchment paper or a silicone baking mat to catch any stray drips of cheese.
Place your shaped pastry balls onto the prepared baking tray, ensuring you arrange them seam side down. This positioning uses the weight of the filling to help keep the bottom seal locked in place while the dough expands upward. Leave roughly two inches of space between each ball to allow the heat to circulate efficiently. Slide the tray into the center rack of your preheated oven and bake for eighteen to twenty minutes. You are looking for the exterior crust to turn a spectacular, even golden brown color.
Step Five: Whisking the Spicy Glaze
While your pastries are finishing up their time in the oven, you can quickly assemble the glaze. In a small, heatproof bowl, combine your three tablespoons of pure honey, your hot sauce, and your tablespoon of melted unsalted butter. If you desire an extra kick of spice, toss in your small pinch of crushed chili flakes.
Stir the liquid mixture thoroughly until the melted butter and hot honey are completely emulsified into a smooth, glossy syrup. If your honey is particularly thick, you can pop the bowl into the microwave for a brief five seconds to warm it slightly, which makes it infinitely easier to brush smoothly over the hot pastries.
Step Six: Glazing and the Grand Finale
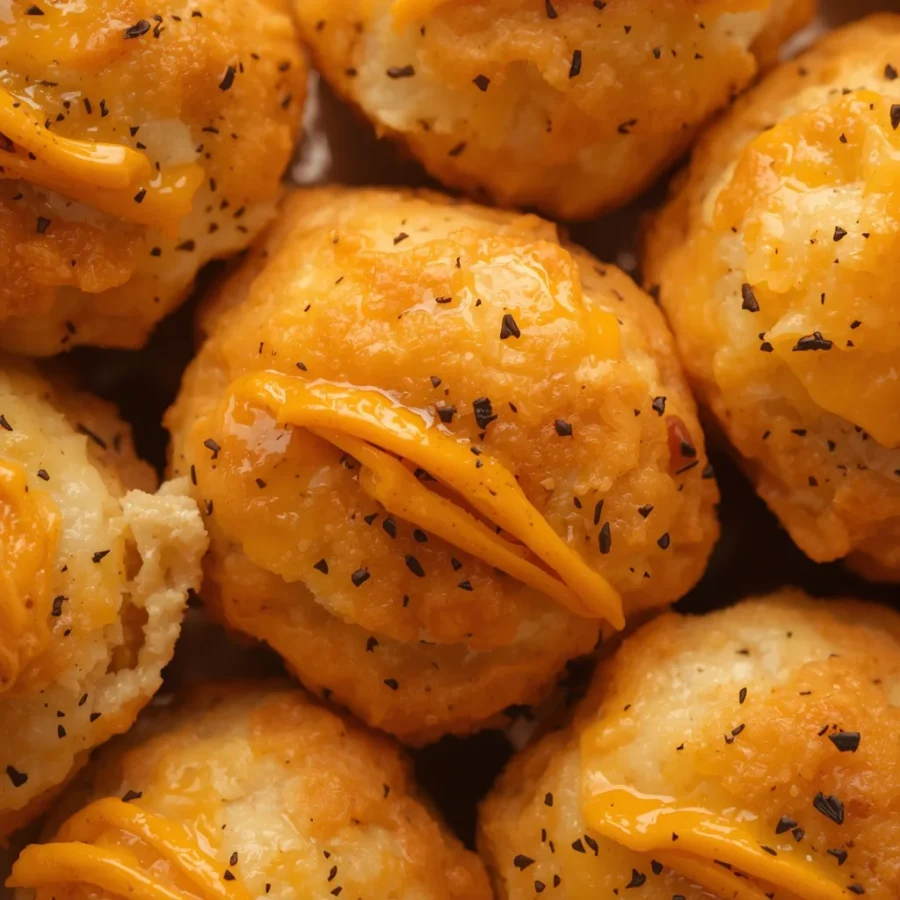
Carefully remove the golden baking tray from your oven. If you want an extra decadent touch, you can immediately sprinkle a tiny pinch of extra shredded cheddar cheese directly over the scorching hot tops of the baked goods, allowing it to melt instantly from the residual heat.
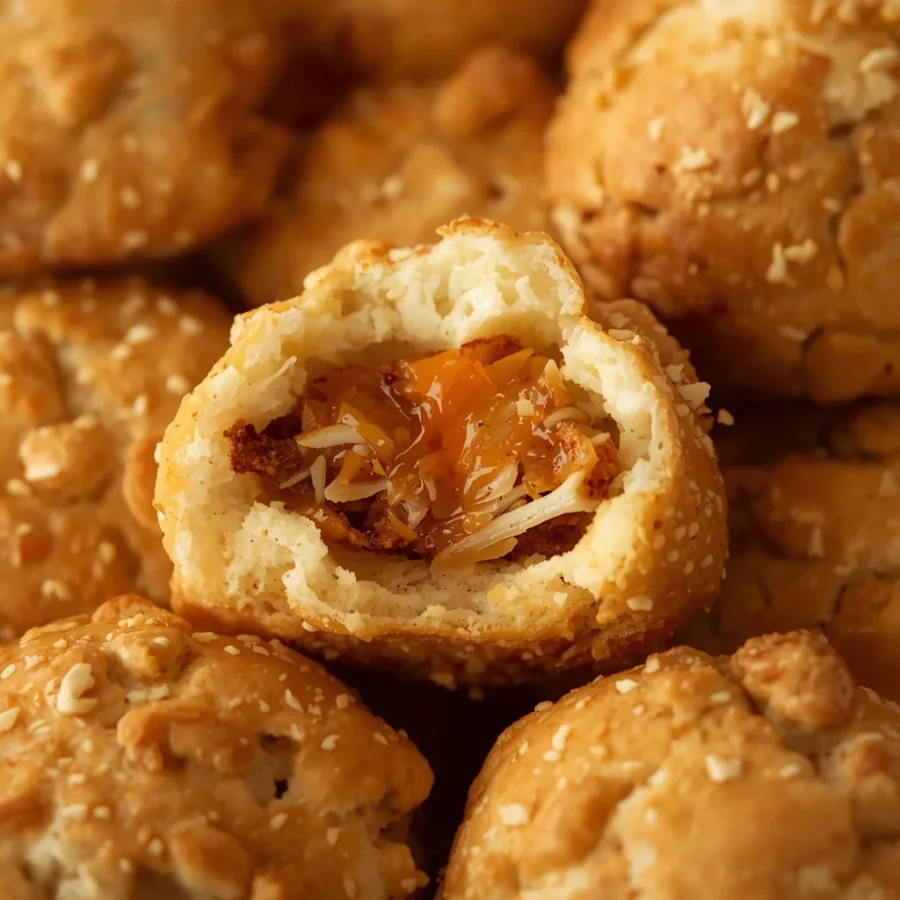
Using a silicone pastry brush, dip deep into your prepared hot honey mixture and generously lacquer the entire surface of each warm pastry ball. The absorbent crust will drink up the sweet, buttery glaze, creating a sticky, brilliant shine. Finish the dish with a delicate scatter of finely chopped fresh parsley for a gorgeous presentation. Transfer the creations to a serving platter and allow them to rest for roughly three to five minutes before serving so the interior molten cheese has a moment to stabilize.
Brilliant Variations to Try for Entertaining: Hot Honey Chicken Biscuit Bombs
Once you understand the basic mechanics of assembling hot honey cheddar chicken biscuit bombs, you can easily modify the ingredients to suit different flavor profiles and dietary preferences.
The Barbecue Bacon Fusion
For a deeply smoky, caramelized variation, try tossing your shredded chicken in a tablespoon of your favorite hickory barbecue sauce before mixing it with the cheeses. You can also fold a quarter cup of crispy, crumbled bacon bits directly into the filling mixture. When paired with the hot honey glaze on the exterior, this modification creates an incredible balance of sweet, smoky, salty, and spicy elements that tastes exactly like a high end smokehouse appetizer.
The Creamy Jalapeno Popper Swap
If your family loves intense heat, you can transform the interior into a fiery, cream cheese forward experience. Increase the plain cream cheese to four tablespoons and fold in a finely diced, deseeded fresh jalapeno pepper alongside your shredded chicken and sharp cheddar. This creates a rich, molten interior that mimics a classic jalapeno popper, while the exterior honey glaze provides a soothing sweetness to balance out the raw pepper heat.
Frequently Asked Questions: Hot Honey Chicken Biscuit Bombs
Can I Hot Honey Chicken Biscuit Bombs ahead of time and freeze them?
Yes, this recipe is incredibly freezer friendly, making it excellent for future quick meals or sudden entertaining needs. You can fully assemble, stuff, and seal the pastry balls, then place them on a tray lined with parchment paper and freeze them raw for one hour. Once they are firm to the touch, transfer the unbaked balls into a heavy duty zip top freezer bag for up to two months. When you are ready to enjoy them, simply bake them directly from frozen at three hundred and seventy five degrees Fahrenheit, adding roughly five to seven extra minutes to the total baking time until they are golden and heated through, then apply the fresh glaze.
Why did my pastry balls burst open and leak cheese in the oven?
If your fillings escaped during the baking process, it usually comes down to one of two structural issues: trapping air or overstuffing the dough. When you gather the edges of the dough over the chicken mixture, try to gently press out any large pockets of trapped air before pinching the seam shut. If air is trapped inside, it will expand violently as it heats up, creating immense pressure that forces the seams apart. Additionally, ensure your hands are completely free of chicken fat or grease when pinching the dough, as moisture can prevent the raw dough edges from fusing together permanently.
Can I use raw chicken instead of precooked chicken?
It is highly recommended that you stick to fully cooked chicken for this specific recipe. Because refrigerated biscuit dough bakes relatively quickly—under twenty minutes—raw poultry would not have sufficient time to safely reach its proper internal target temperature. Utilizing pre-cooked shredded breast or thigh meat ensures that the filling is completely safe to consume the moment the pastry exterior achieves that perfect golden brown hue.
Conclusion: Hot Honey Chicken Biscuit Bombs
Creating a batch of homemade comfort food should always be an enjoyable, low stress project, and baking these spectacular hot honey cheddar chicken biscuit bombs proves that complex flavors can come from incredibly straightforward techniques. By anchoring the dish with a rich, savory chicken and cheddar filling, wrapping it inside a beautifully flaked biscuit crust, and finishing it with an assertive, glossy hot honey lacquer, you elevate simple comfort staples into a true culinary masterpiece. Whether you serve them as a surprise weeknight dinner treat or line them up across a crowded game day snack table, these golden pastries offer a harmonious balance of sweet, salty, and spicy notes that will keep everyone coming back for more. Clear off your workspace, gather your ingredients, and enjoy the absolute satisfaction of serving a warm, buttery appetizer that delivers an explosion of exceptional flavor in every single bite.
Print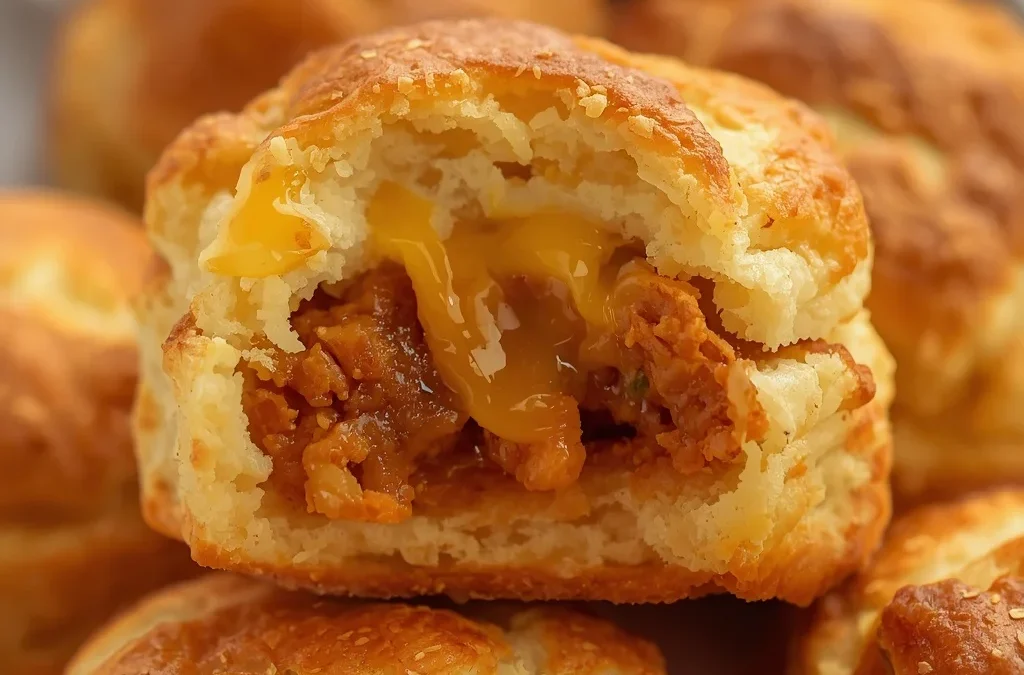
The Ultimate Guide to Making Hot Honey Cheddar Chicken Biscuit Bombs at Home
- Total Time: 40 minutes
- Yield: 8 biscuit bombs 1x
Description
To truly appreciate this modern culinary creation, it helps to understand the anatomy of a stuffed biscuit. Traditional American biscuits are celebrated for their flaky, laminated layers and buttery crumb, usually served split open with a pat of butter, sweet jam, or a ladle of thick sausage gravy. A biscuit bomb flips this concept entirely on its head by turning the pastry into an enclosed, self contained vessel.
Ingredients
For the Filling
- 2 cups cooked chicken (shredded or chopped)
- 1 cup shredded cheddar cheese
- 2 tablespoons cream cheese (optional, for creaminess)
- ½ teaspoon garlic powder
- ½ teaspoon smoked paprika
- Salt & black pepper to taste
For the Biscuit Dough
- 1 can refrigerated biscuit dough (8 biscuits)
or homemade biscuit dough if preferred
For Hot Honey Glaze
- 3 tablespoons honey
- 1–2 teaspoons hot sauce (adjust to taste)
- 1 tablespoon melted butter
- Pinch of chili flakes (optional)
Optional Topping
- Extra cheddar cheese
- Fresh parsley
Instructions
1. Prepare the filling
- Mix shredded chicken, cheddar cheese, cream cheese, garlic powder, paprika, salt, and pepper in a bowl.
- Stir until well combined.
2. Flatten the biscuits
- Take each biscuit and flatten it into a circle using your hands or a rolling pin.
3. Fill and seal
- Add 1–2 tablespoons of chicken filling in the center.
- Fold edges over and pinch tightly to seal into a ball.
4. Bake
- Preheat oven to 375°F (190°C).
- Place biscuit bombs seam-side down on a lined baking tray.
- Bake for 18–20 minutes until golden brown.
5. Make hot honey glaze
- Mix honey, hot sauce, melted butter, and chili flakes in a small bowl.
6. Glaze and finish
- Brush warm biscuit bombs with hot honey glaze.
- Sprinkle extra cheese or parsley if desired.
7. Serve
- Serve warm for the best gooey, cheesy center.
Notes
These Hot Honey Cheddar Chicken Biscuit Bombs are the perfect mix of sweet, spicy, and cheesy goodness. Best served warm, they make an irresistible snack, appetizer, or quick comfort meal.
- Prep Time: 20 minutes
- Cook Time: 20 minutes
- Category: Snack / Appetizer
- Method: Baking
- Cuisine: American
Nutrition
- Serving Size: 1 biscuit bomb
- Calories: ~310 kcal
Keywords: Stuffed chicken biscuit bites, spicy honey cheesy biscuits, easy chicken appetizers, shredded chicken crescent bombs, baked hot honey chicken puff, game day finger foods