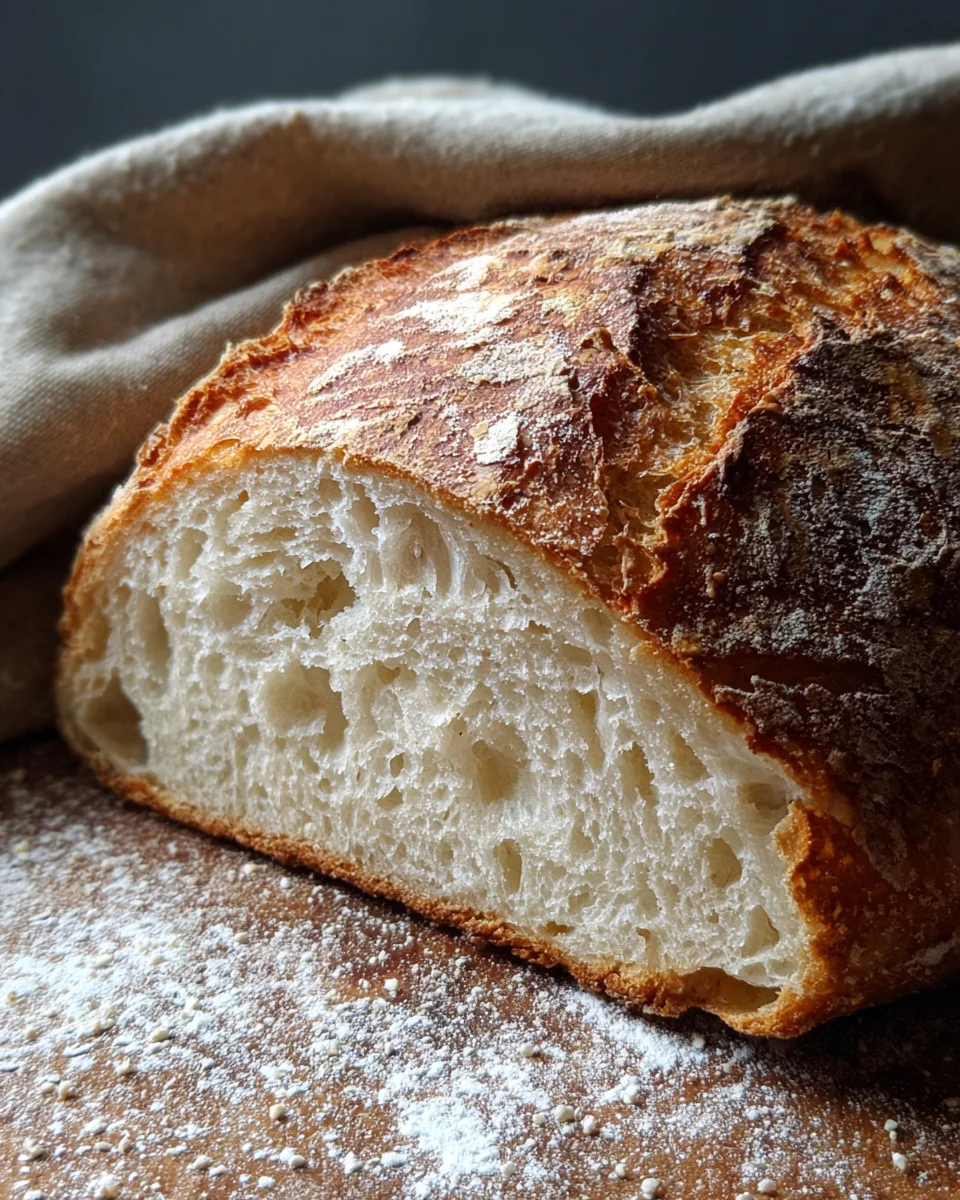
There is something deeply primal and immensely satisfying about the scent of fresh bread wafting through a home. For many of us, the journey into traditional baking starts with a rustic, crusty boule that looks like it belongs in a medieval painting. However, as beautiful as those artisanal loaves are, they are not always the most practical choice for a Tuesday morning lunch. That is where this Sourdough Sandwich Bread Recipe enters the picture. It provides all the complex, fermented benefits of traditional sourdough but delivers them in a soft, uniform, and sliceable format that fits perfectly in a toaster or a lunchbox.
Creating a soft loaf using only natural leavening is often considered the “holy grail” of home baking. We want that signature tang and the gut-healthy benefits of fermentation, but we also want a crumb that is tender enough for a peanut butter and jelly sandwich. In this comprehensive guide, we will break down the science of the soft sourdough crumb, explore the history of this kitchen staple, and walk through every detail to ensure your kitchen produces bakery-quality results every single time you bake.
What is a Sourdough Sandwich Bread?
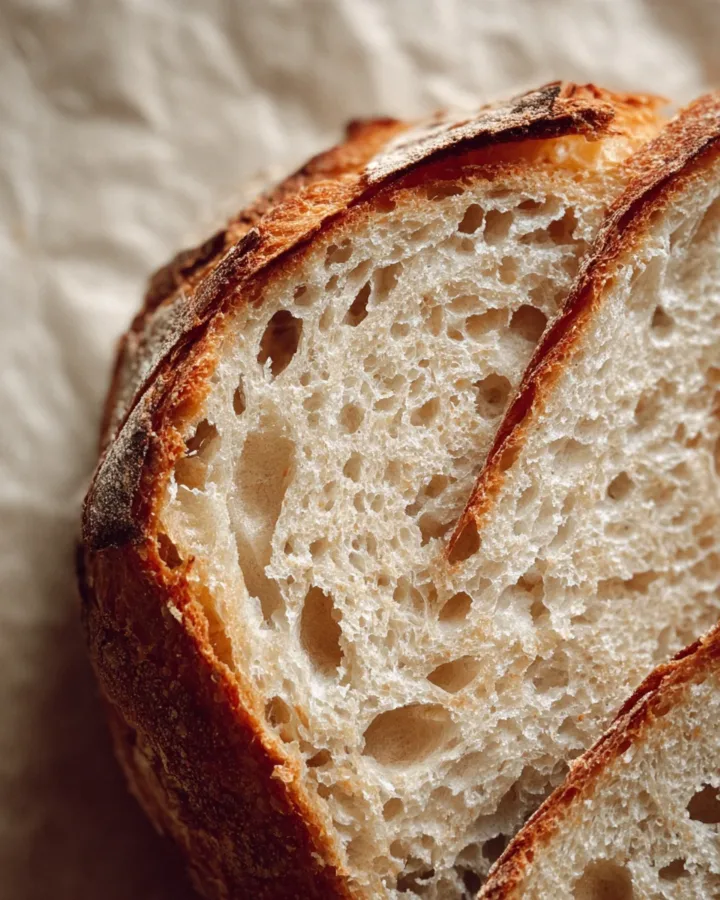
When we talk about a Sourdough Sandwich Bread Recipe, we are describing a hybrid of sorts. While traditional sourdough usually consists of just flour, water, and salt, a sandwich loaf often incorporates what bakers call “enrichments.” These are ingredients like fats and sweeteners that interfere with the gluten structure just enough to create a soft, pillowy texture rather than a chewy, holes-filled artisanal crumb.
The primary difference lies in the hydration and the additions. By adding a bit of oil or butter and a touch of honey or sugar, we are softening the crust and making the interior much more tight and uniform. This makes it the ideal vessel for spreads, deli meats, or simply a thick layer of salted butter. It still relies entirely on a wild yeast starter for its rise, which means you get that beautiful rise and complex flavor profile without the need for commercial yeast packets.
The Ancient Origin of Sourdough Sandwich Bread Recipe
The history of sourdough is essentially the history of civilization itself. Thousands of years before the invention of the commercial yeast we see in grocery stores today, ancient Egyptians were likely the first to discover that leaving grain and water out would attract wild yeast from the air, causing the mixture to bubble and expand. This was the birth of the sourdough starter, a living culture that has been passed down through generations.
The transition to a specific Sourdough Sandwich Bread Recipe happened much later, particularly during the industrial revolution when the demand for uniform, easy-to-slice bread grew. People wanted the health benefits of fermented grains but needed a shape that was efficient for the modern lifestyle. In the United States, the famous San Francisco sourdough became a legend, but home bakers across the world have always adapted their starters to create softer, pan-baked loaves that could last a few days on the counter without turning into a rock.
Why Choose Sourdough Over Commercial Bread?
If you have ever looked at the back of a plastic-wrapped loaf of bread from the supermarket, you have seen a long list of preservatives, conditioners, and additives designed to keep the bread soft for weeks. When you use this Sourdough Sandwich Bread Recipe, you are removing all those chemicals and replacing them with a slow, natural fermentation process.
Slow fermentation breaks down the phytic acid in the flour, which makes the nutrients in the wheat more bioavailable and easier for your body to digest. Many people who feel bloated after eating standard white bread find that they can enjoy sourdough without any issues. Furthermore, the lactic acid produced during the fermentation process acts as a natural preservative, giving the bread a longer shelf life and a flavor depth that commercial bread simply cannot replicate.
Ingredients with Quantity: Sourdough Sandwich Bread Recipe
To achieve the perfect balance of softness and strength, you will need the following ingredients. Please ensure your starter is active and at its peak before you begin the process.
-
One cup of active sourdough starter: This should be fed and bubbly, roughly two hundred and forty grams.
-
One and one quarter cups of warm water: Approximately three hundred milliliters. Ensure it is not hot, as high heat can kill the wild yeast.
-
Two tablespoons of sugar or honey: This feeds the yeast and helps soften the crumb while providing a beautiful golden color to the crust.
-
Two tablespoons of olive oil or melted butter: This enrichment is what separates a sandwich loaf from a crusty boule, ensuring the bread remains soft.
-
Four cups of bread flour: Approximately five hundred grams. You can use all-purpose flour, but bread flour provides a better rise and structure.
-
One and one half teaspoons of salt: This regulates the yeast activity and brings out the flavor of the wheat.
Step by Step Direction and Preparation Method
Patience is the most important ingredient in any Sourdough Sandwich Bread Recipe. Follow these steps carefully to master the art of the soft loaf.
Step One: Mixing the Dough
In a large mixing bowl, combine your active sourdough starter, the warm water, your sweetener of choice, and the fat. Stir these together until the starter is mostly dissolved into the liquid. Gradually add your bread flour and salt. Use a sturdy spoon or your hands to stir until a rough, shaggy mass forms and no dry streaks of flour remain.
Step Two: The Kneading Process
Turn the dough out onto a lightly floured surface. Knead the dough for eight to ten minutes. You are looking for the dough to transform from a sticky mess into a smooth, elastic ball. If you are using a stand mixer, five to six minutes on medium-low speed with a dough hook should suffice. The dough should pass the “windowpane test,” meaning you can stretch a small piece thin enough to see light through it without it tearing.
Step Three: First Rise and Bulk Fermentation
Place the dough back into a lightly greased bowl and cover it with a damp cloth or plastic wrap. Let it sit at room temperature. Depending on the warmth of your kitchen, this can take anywhere from four to six hours. You are waiting for the dough to double in size. This is where the flavor is built, so do not try to rush this stage.
Step Four: Shaping the Loaf
Gently turn the dough out onto your workspace. Be careful not to knock all the air out. Gently deflate it and fold it into a rectangle. Roll the dough up tightly into a log shape, creating tension on the outer skin. Place the shaped dough into a greased loaf pan, making sure the seam side is facing down.
Step Five: The Second Rise
Cover the loaf pan and let the dough rise again. This second proof usually takes between one and a half to three hours. You want the dough to look puffy and to have risen slightly above the edge of the pan. If you poke it gently with a finger, the indentation should spring back slowly.
Step Six: The Baking Stage
Preheat your oven to three hundred and seventy five degrees Fahrenheit. If you like a shiny crust, you can brush the top with a bit of milk or an egg wash, though it is not strictly necessary. Bake the loaf for thirty five to forty minutes. The top should be a deep golden brown, and the bottom of the loaf should sound hollow when tapped.
Step Seven: The Cooling Period
This is the hardest part. Remove the bread from the pan immediately and place it on a wire cooling rack. You must let the bread cool completely—usually at least two hours—before slicing. Slicing into hot sourdough will cause the steam to escape too quickly, leading to a gummy and dense texture.
Creative Variations of the Soft Sourdough Loaf
Once you feel comfortable with the base Sourdough Sandwich Bread Recipe, you can start to play with the flavors and textures to suit your family’s preferences.
Whole Wheat Integration
For a heartier, more rustic sandwich bread, you can replace one cup of the bread flour with one cup of whole wheat flour. You may need to add an extra tablespoon of water, as whole wheat flour absorbs more moisture. This adds a nutty flavor and increases the fiber content of your sandwiches.
Herb and Garlic Infusion
Add one tablespoon of dried rosemary and one teaspoon of garlic powder during the initial mixing phase. This creates an incredibly aromatic bread that is perfect for making grilled cheese sandwiches or serving alongside a bowl of tomato soup.
Cinnamon Raisin Twist
During the shaping phase, flatten the dough and sprinkle a mixture of cinnamon, sugar, and raisins over the surface before rolling it into a log. This transforms the savory sandwich loaf into a beautiful breakfast bread that toasts up perfectly with a bit of cream cheese.
Secrets to a Soft Sourdough Sandwich Bread Recipe
If you find that your sourdough is coming out with a thick, hard crust, there are a few tricks you can employ. First, ensure you are using a fat like butter or oil. These ingredients coat the gluten strands and keep them from forming a tough bond.
Another trick is to brush the top of the loaf with melted butter immediately after it comes out of the oven while it is still piping hot. The butter will soak into the crust as it cools, ensuring it stays soft and easy to bite through. Additionally, baking at a slightly lower temperature like three hundred and seventy five degrees, rather than the four hundred and fifty degrees used for artisanal loaves, prevents the crust from becoming too thick and caramelized.
Frequently Asked Questions: Sourdough Sandwich Bread Recipe
Can I use a sourdough starter that has been in the fridge?
You can, but it needs to be woken up first. Take your starter out of the refrigerator and feed it at least once or twice until it is doubling in size consistently within four to six hours. Using a cold, sluggish starter will result in a very long rise time and a much more sour, potentially unpleasant flavor.
My dough is too sticky to knead, what should I do?
Sourdough can be quite tacky compared to commercial yeast dough. Instead of adding massive amounts of flour, which can make the bread dry, try wetting your hands with a little water or oil while kneading. You can also use the “stretch and fold” method in the bowl if the dough feels too difficult to handle on the counter.
How do I know when the bulk fermentation is finished?
The best indicator is visual. The dough should look aerated, have a few visible bubbles on the surface, and have doubled in volume. If you shake the bowl gently, the dough should jiggle like gelatin. If it still looks dense and heavy, it needs more time.
Why did my Sourdough Sandwich Bread Recipe collapse in the oven?
This is usually a sign of over-proofing during the second rise. If the dough rises too much in the pan, the gluten structure becomes weak and cannot support the weight of the bread once the heat of the oven causes the gasses to expand. Aim to bake when the dough is just an inch above the pan edge.
How should I store my homemade sourdough?
Because this bread has no artificial preservatives, it is best kept in a paper bag or a bread box at room temperature for up to three or four days. If you want it to last longer, slice the loaf once it is cool and freeze the slices in a sealed bag. You can take out exactly what you need and toast it directly from the freezer.
Conclusion: Sourdough Sandwich Bread Recipe
Mastering a Sourdough Sandwich Bread Recipe is a journey that connects you to the most ancient traditions of cooking while providing a practical, healthy solution for your modern kitchen. There is a learning curve to working with wild yeast, but the rewards are found in every soft, tangy slice you serve to your family. By focusing on high-quality ingredients and respecting the slow pace of natural fermentation, you are creating more than just food; you are creating a heritage of health and flavor. Whether it is used for a simple morning toast or an elaborate gourmet sandwich, this loaf stands as a testament to the beauty of slow food in a fast world. Take your time, enjoy the process of kneading and shaping, and soon you will never want to go back to store-bought bread again.
Print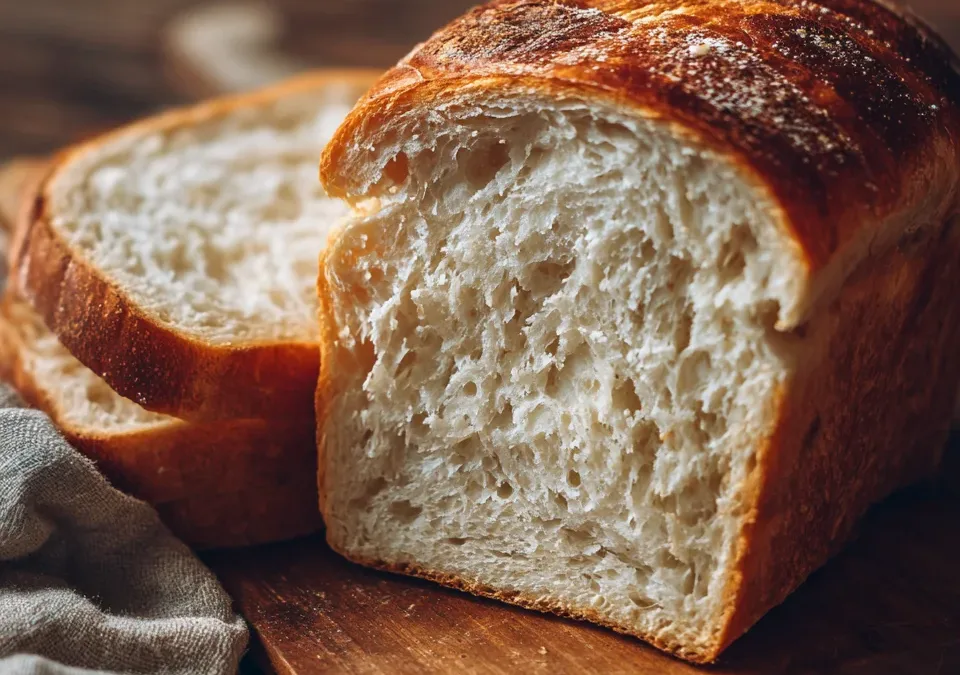
The Ultimate Sourdough Sandwich Bread Recipe: Soft Tangy and Perfect
- Total Time: 10–12 hours
- Yield: 1 loaf 1x
- Diet: Vegetarian
Description
When we talk about a Sourdough Sandwich Bread Recipe, we are describing a hybrid of sorts. While traditional sourdough usually consists of just flour, water, and salt, a sandwich loaf often incorporates what bakers call “enrichments.” These are ingredients like fats and sweeteners that interfere with the gluten structure just enough to create a soft, pillowy texture rather than a chewy, holes-filled artisanal crumb.
Ingredients
- 1 cup (240g) active sourdough starter (fed and bubbly)
- 1 ¼ cups (300ml) warm water
- 2 tbsp sugar or honey
- 2 tbsp olive oil or melted butter
- 4 cups (500g) bread flour (or all-purpose flour)
- 1 ½ tsp salt
Instructions
- Mix dough
In a large bowl, combine sourdough starter, water, sugar, and oil. Mix well. Add flour and salt, then stir until a rough dough forms. - Knead
Knead for 8–10 minutes until smooth and elastic (or use a stand mixer for 5–6 minutes). - First rise (bulk fermentation)
Cover and let rise at room temperature for 4–6 hours, or until doubled in size. - Shape loaf
Gently deflate dough and shape into a loaf. Place into a greased loaf pan. - Second rise
Cover and let rise again for 1.5–3 hours until puffy and slightly above the pan edge. - Bake
Preheat oven to 375°F (190°C). Bake for 35–40 minutes until golden brown. - Cool
Remove from pan and cool completely before slicing.
Notes
This sourdough sandwich bread is soft, flavorful, and lightly tangy, making it a wholesome upgrade from store-bought loaves. Its tender crumb and sturdy structure make it perfect for sandwiches, toast, or everyday meals, bringing homemade comfort and bakery-quality taste to your kitchen.
- Prep Time: 20 minutes
- Cook Time: 40 minutes
- Category: Bread
- Method: Baking
- Cuisine: European
Nutrition
- Serving Size: 1 slice
- Calories: 160 kcal
Keywords: Soft sourdough sandwich loaf, homemade sourdough pan bread, enriched sourdough bread recipe, sourdough sandwich bread with starter