If you have ever scrolled through social media and seen those mesmerizing, bite-sized treats that look exactly like elegant Japanese maki but are clearly made of chocolate, you have likely encountered the Oreo sushi rolls phenomenon. It is one of those rare internet trends that actually tastes as good as it looks. This dessert is the perfect intersection of creativity and simplicity, proving that you do not need an oven or a pastry degree to make something that stops people in their tracks.
In this guide, we are going to dive deep into everything you need to know about making these delightful treats. Whether you are looking for a weekend activity with the kids or a unique dessert to impress your friends at a dinner party, Oreo sushi rolls are the answer. They are sweet, creamy, and offer that iconic crunch we all love from the world’s favorite sandwich cookie.
What is the Oreo Sushi Rolls Recipe?
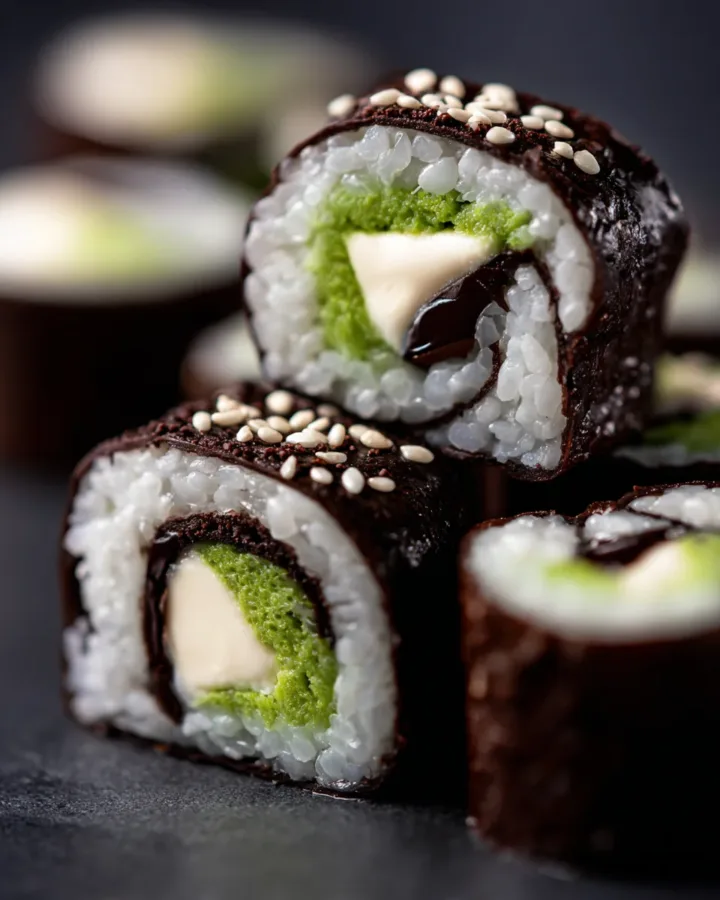
At its core, the Oreo sushi rolls recipe is a clever deconstruction and reconstruction of an Oreo cookie. Instead of the traditional cocoa biscuits sandwiching a layer of creme, we transform the biscuits into a flexible, dark “seaweed” (nori) wrapper and use the creme (often bolstered by extra ingredients) as the “rice” and “fish” filling.
The magic lies in the texture. By crushing the cookies and adding a small amount of liquid, you create a moldable dough that mimics the structural integrity of a sushi roll. When you slice into the finished product, the contrast between the dark chocolate exterior and the bright white interior creates a visual aesthetic that is unmistakably sushi-like. It is a whimsical play on food that appeals to the inner child in everyone.
The Origin of This Oreo sushi rolls
While it is difficult to pinpoint the exact moment the first Oreo sushi rolls were rolled into existence, the recipe gained massive global popularity through short-form video platforms like TikTok and Instagram. It falls into the “hack” category of cooking—where everyday pantry staples are reimagined in ways the original manufacturers never intended.
The concept draws inspiration from traditional Japanese sushi preparation techniques, specifically the makizushi style, which involves rolling ingredients in a sheet of dried seaweed using a bamboo mat. By substituting savory ingredients for sweet ones, food creators tapped into the “fusion dessert” trend. This recipe specifically blew up because it only requires two or three primary ingredients, making it accessible to anyone regardless of their kitchen equipment or budget.
Essential Ingredients for Your Sweet Sushi
To make the best Oreo sushi rolls, quality and temperature of ingredients matter. While the list is short, each component plays a vital role in the final texture.
-
One pack of Oreo cookies: You can use the standard chocolate version, but Golden Oreos or even flavored versions like mint or peanut butter can create interesting “fusion” variations.
-
Four to five tablespoons of milk: This acts as the binding agent. You can use whole milk for richness or a plant-based alternative like almond or oat milk.
-
One cup of whipped cream: This provides the light, airy “rice” layer. For those who prefer a denser, more decadent bite, you can substitute this with softened cream cheese or a heavy mascarpone.
-
Optional toppings: Chocolate syrup for “soy sauce,” shredded coconut for a “rice” exterior, or even small fruit strips like strawberries or mango to mimic raw fish.
Step by Step Direction and Preparation Method: Oreo sushi rolls
Creating Oreo sushi rolls is an art of patience rather than heat. Follow these steps carefully to ensure your rolls are tight and your slices are clean.
Separating and Crushing the Oreos
The first step is perhaps the most therapeutic. You need to separate every single cookie in the pack. Gently twist the cookies apart and scrape the white creme filling into a small bowl. Set this filling aside, as it will be the base for your “sushi” interior.
Once you have a bowl of just the chocolate discs, you need to turn them into a fine dust. You can use a food processor for a perfectly uniform texture, or place them in a sealed plastic bag and crush them with a rolling pin. The goal is to avoid any large chunks, as these will cause your “nori” dough to crack when you try to roll it.
Crafting the Chocolate Dough
Transfer your fine cookie crumbs into a mixing bowl. Now, add the milk one tablespoon at a time. This is a crucial moment—if you add too much milk, the dough will be sticky and impossible to handle; too little, and it will be crumbly. Mix until the crumbs come together into a soft, pliable ball that feels similar to play dough or a firm brownie batter.
Rolling the Perfect Foundation
To prevent the dough from sticking to your counter, place it between two large sheets of parchment paper or plastic wrap. Use a rolling pin to flatten the dough into a rectangular shape. Try to keep the thickness uniform, roughly an eighth of an inch thick. Once rolled out, you can use a knife to trim the edges of the rectangle to make them straight and sharp, which helps in achieving a professional look later on.
Spreading the Filling
Now, take the Oreo creme you saved earlier. If you are using whipped cream or cream cheese, fold it into the Oreo creme to create a smooth, spreadable mixture. Gently spread this white filling over your chocolate rectangle, leaving a small margin at the very top edge. This margin will help seal the roll once you reach the end.
The Rolling Technique
Just like real sushi, the “roll” is the most intimidating part, but it is actually quite simple. Using the bottom sheet of parchment paper to help you, lift the edge of the chocolate dough and begin folding it over the filling. Work slowly and use the paper to tuck the roll tightly as you go. The goal is a firm, compact log. Once it is fully rolled, wrap it tightly in the parchment paper or plastic wrap to maintain its shape.
The Chilling Phase
Do not skip this step. Place your wrapped log in the refrigerator for at least thirty minutes. If you are in a hurry, fifteen minutes in the freezer will work. This allows the fats in the cream and the cookie dough to solidify, ensuring that when you go to slice it, the roll holds its circular shape rather than squishing under the pressure of the knife.
Slicing and Presentation
Use a very sharp, thin-bladed knife. For the cleanest cuts, dip the knife in warm water and wipe it clean between every single slice. Cut the log into rounds about one inch thick. Arrange them on a platter with a side of chocolate syrup in a small dish (to look like soy sauce) and perhaps some green-tinted coconut or frosting to represent wasabi.
Exciting Variations of Oreo Sushi Rolls
Once you have mastered the basic Oreo sushi rolls recipe, you can start experimenting with different flavors and textures to keep things interesting.
The Tropical Roll
Roll your finished log in sweetened shredded coconut before slicing. This gives the exterior a white, “rice-like” appearance and adds a chewy texture that pairs beautifully with the chocolate. You can even place a thin strip of fresh mango in the center before rolling to mimic the fruit found in many specialty sushi rolls.
The Red Velvet Variation
Use Red Velvet Oreos and a cream cheese filling. The deep red color of the dough contrasted with the bright white filling makes for a stunning visual, perfect for Valentine’s Day or holiday parties.
The Nutty Crunch
Add a thin layer of peanut butter or hazelnut spread over the chocolate dough before adding the cream filling. This adds a layer of complexity to the flavor profile and satisfies those who love the classic combination of chocolate and nuts.
Frequently Asked Questions: Oreo sushi rolls
Can I make these ahead of time?
Yes! In fact, Oreo sushi rolls often taste better after they have sat in the fridge for a few hours as the flavors meld. You can make them a day in advance; just keep them tightly wrapped in the fridge so they do not dry out.
Why is my dough cracking?
If your dough is cracking, it is likely too dry. Try adding a teaspoon of milk and re-kneading it. Also, ensure you are rolling it out at room temperature, as cold dough is less flexible.
What can I use instead of milk?
If you want an even richer flavor, you can use heavy cream or melted butter. For a dairy-free version, any nut milk or even a bit of water will work, though water will result in a less creamy taste.
How do I store the leftovers?
Store any remaining sushi pieces in an airtight container in the refrigerator. They will stay fresh for up to three to four days.
Can I freeze Oreo sushi rolls?
Absolutely. They actually make a great frozen treat. If you freeze them, let them sit at room temperature for about five minutes before eating so they are not too hard to bite into.
Conclusion: Oreo sushi rolls
The Oreo sushi rolls recipe is a testament to the fact that culinary joy does not always require heat or complex techniques. It is a visual masterpiece that relies on the simple, nostalgic flavors of chocolate and cream. By taking the time to separate the cookies, create a supple dough, and roll them with care, you end up with a dessert that is as much a conversation starter as it is a treat. Whether you are serving them at a kid’s birthday party or as a quirky end to a dinner date, these rolls are guaranteed to bring a smile to anyone’s face. So grab a pack of cookies, find a flat surface, and start rolling your way to a new favorite no-bake dessert.
Print
The Ultimate Guide to Making Oreo Sushi Rolls: A Fun No-Bake Dessert
- Total Time: 15–20 minutes (plus chilling time)
- Yield: 4–5 servings 1x
- Diet: Vegetarian
Description
At its core, the Oreo sushi rolls recipe is a clever deconstruction and reconstruction of an Oreo cookie. Instead of the traditional cocoa biscuits sandwiching a layer of creme, we transform the biscuits into a flexible, dark “seaweed” (nori) wrapper and use the creme (often bolstered by extra ingredients) as the “rice” and “fish” filling.
Ingredients
- 1 pack of Oreo cookies
- 4–5 tbsp milk
- 1 cup whipped cream (or cream cheese for a richer version)
- Optional: chocolate syrup, sprinkles, or fruit strips
Instructions
- Crush the Oreos
Remove the cream filling (set it aside if you want). Crush the cookies into fine crumbs using a blender or by hand. - Make the dough
Add milk gradually to the crumbs and mix until it forms a soft, moldable dough (like cookie dough). - Roll it out
Place the dough between two sheets of plastic wrap or parchment paper and roll it into a flat rectangle. - Add the filling
Spread whipped cream or the Oreo cream evenly across the surface. - Roll like sushi
Carefully roll the sheet into a tight log (like a sushi roll). - Chill
Refrigerate for about 30 minutes so it firms up. - Slice and serve
Cut into small round pieces—just like sushi! Drizzle chocolate syrup or add toppings if you like.
Notes
These Oreo sushi rolls are a fun and creative twist on classic desserts. Perfect for parties or a quick sweet treat, they’re easy to make and even more fun to eat. You can customize them with your favorite fillings and toppings to make each roll unique!
- Prep Time: 15 minutes
- Cook Time: 0 minutes
- Category: Dessert
- Method: No-bake
- Cuisine: Fusion
Nutrition
- Serving Size: 4–5 pieces
- Calories: ~180 kcal per serving